
Understanding Guitar Grounding
Practicing your guitar makes you a better guitar player. Understanding guitar wiring makes you a better Tone Wizard. And, properly grounding your guitar’s electronics makes your guitar as quiet as it can be. In today’s article, we will delve into the world of grounding: The basics, common myths, and best practices!
THE BASICS
A Ground (or Earth) connection is a term that relates to a multitude of topics related to electrical engineering. For our intents and purposes, a proper Ground connection is an essential part of your guitar’s wiring. A Ground Connection connects every piece of metal on your guitar and acts as a return path to the amp. In part, the Guitar’s Ground Connection helps remove unwanted noise, and is essential for safety – It allows electricity to travel safely to the amp to dissipate.

Your guitar is surrounded by many things that emit or produce EMI, or electromagnetic interference. Look around you – you’re probably in front of a computer, near some lighting, and most likely close to some electrical lines.
These are all sources of EMI, and there are thousands of them all around us. Your guitar will pick up a multitude of these. However, if you properly ground your guitar, you can get your guitar as quiet as it can be (single coils will still hum), and not introduce sound via improper grounding.
GUITAR GROUNDING MYTHS
There are a few Guitar Grounding Myths that we want to dispel:
MORE IS BETTER:
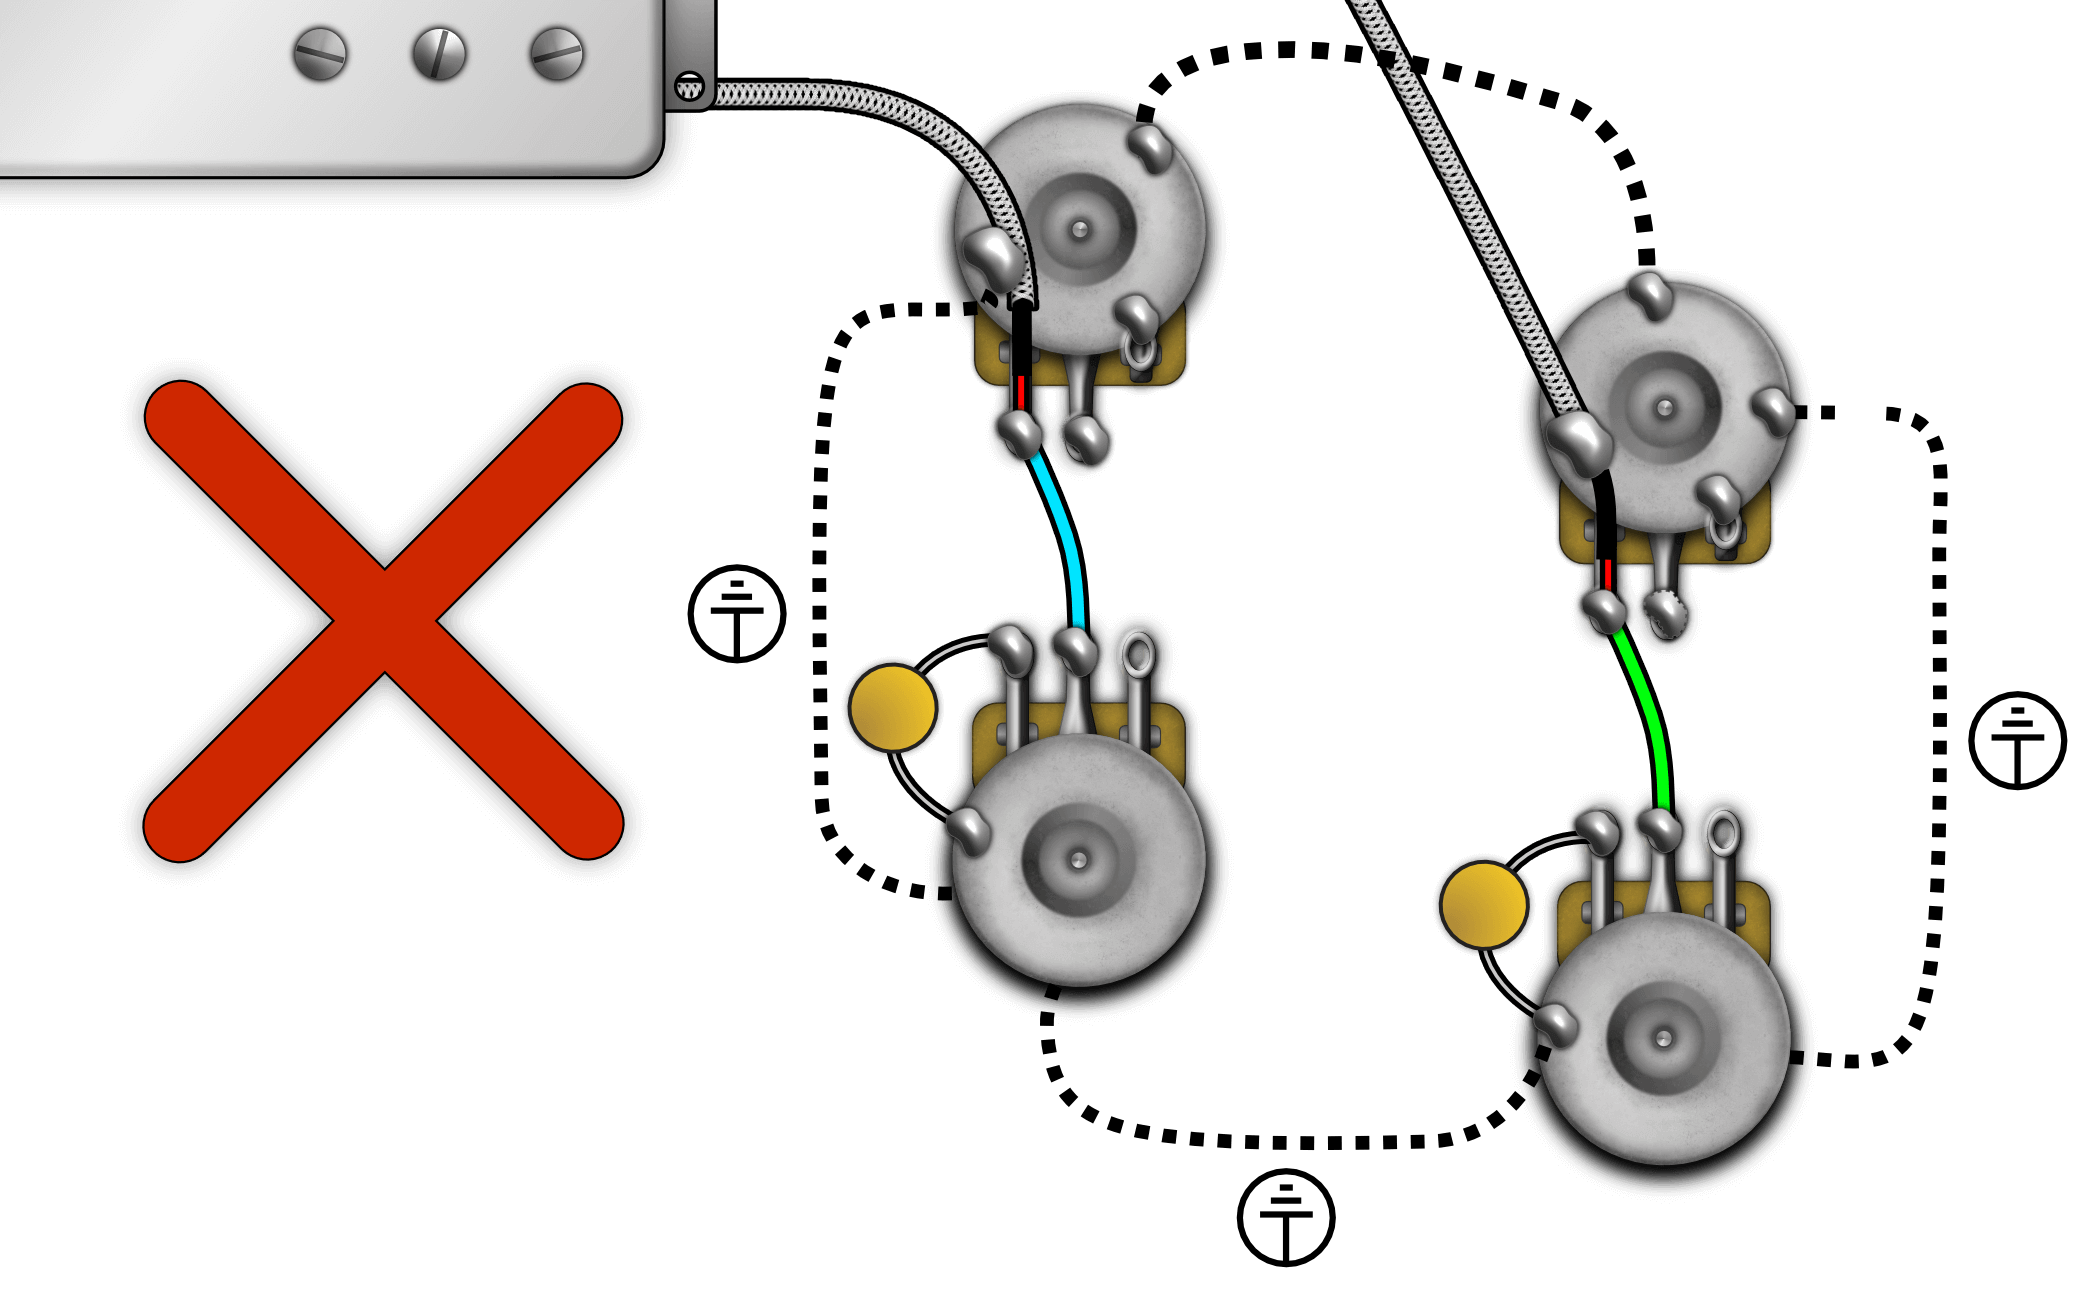
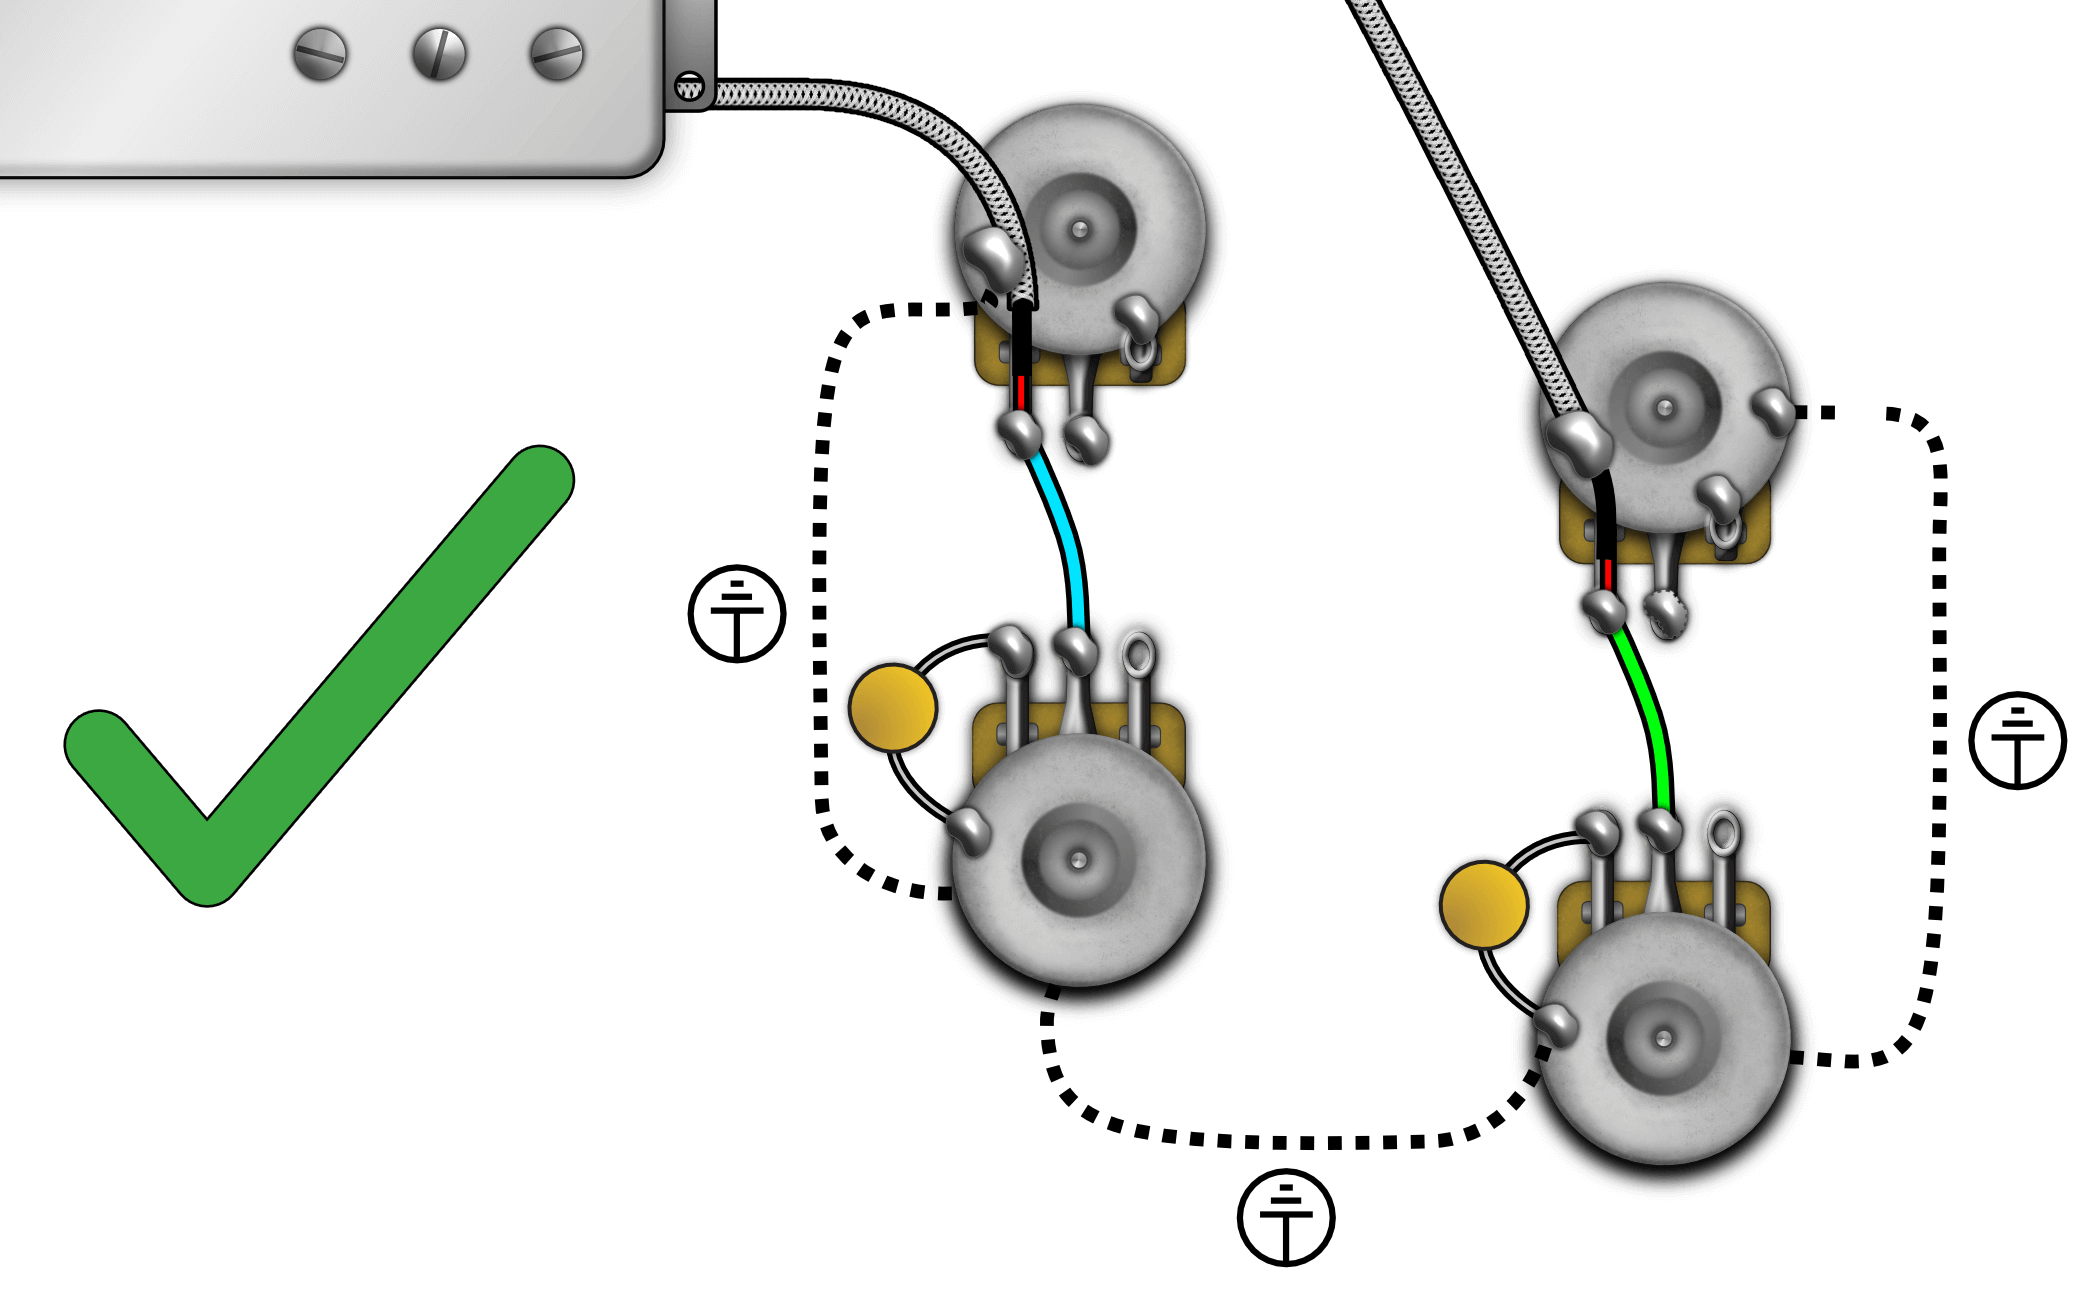
Definitely not. Proper grounding means it only needs to connect correctly to the ground once. Grounding items multiple times creates a few problems. For one, using wire to ground a series of pots in a circle creates a one-turn coil. If you’ve checked out our article on humbuckers, then you know that EMI usually enters the coil, not through the magnetic field. Creating a loop of ground connections will introduce noise into your signal.
Take a look at the following images. You’ll see an incorrect and proper way to ground a Gibson Les Paul®.
YOU GROUND OUT THE STRINGS
Grounding your strings is essential for having a quieter guitar. If you’ve ever noticed your guitar’s noise gets quieter when you touch the strings, you might have thought your body grounds your guitar’s parts. You’d be wrong if you did. It turns out, a human being makes a pretty good EMI (Electromagnetic Interference) antennae! Your body is an antenna for all sorts of EMI, so when you touch your guitar strings, the guitar is grounding you! Pretty cool, right?
“STAR” GROUNDING: GOOD OR BAD?
Star Grounding refers to the method of grounding that connects all grounds to a Single Point. For example, think of the back of a Strat Volume Pot: It tends to be a central hub for ground connections. Some electrical engineers state that Star Grounding doesn’t make a difference, but Lindy prefers this method. His reasoning? All ground connections connect to the output jack sleeve anyway. Also, it’s harder to create a ground loop by practicing Star Grounding.
BEST PRACTICES
CONNECT EVERYTHING, BUT CONNECT IT ONCE.
Take a look at the following image of a Strat – notice how each part connects to ground once. Notice any jumpers? The Shielding on the back of the pickguard is connecting everything. If you were to add jumpers between pots, you’d be creating a “Ground Loop,” and introducing noise into your circuit.
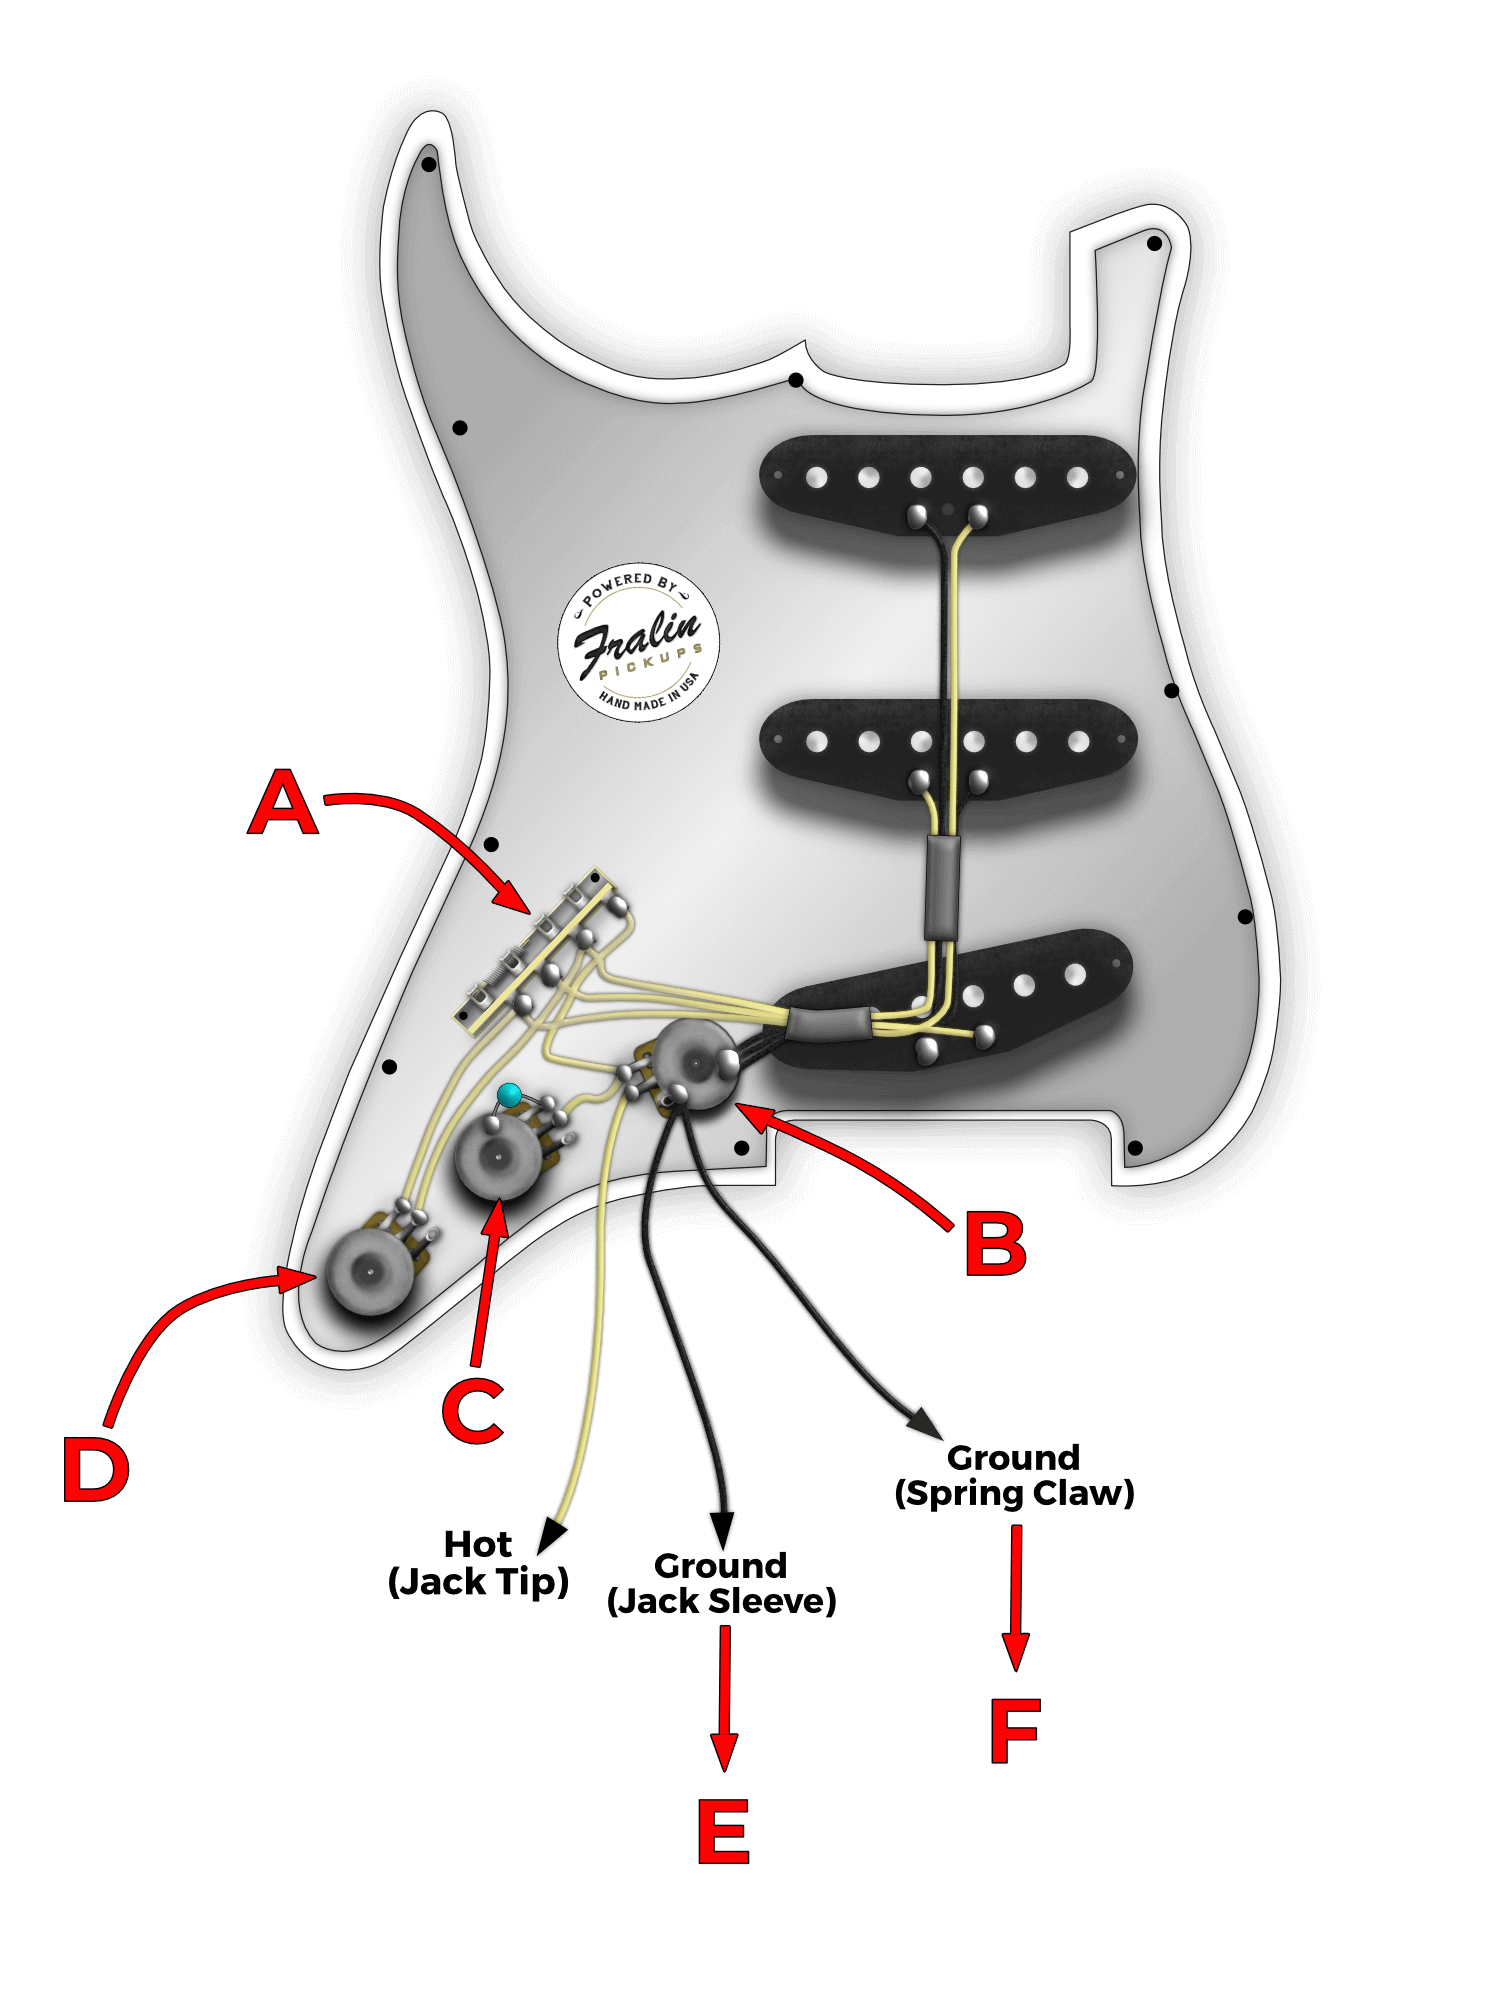
This is a method of “Star Grounding”. You can see that the Volume Pot is more or less a central hub for all points of ground contact. Adding more ground jumpers to the parts will create more ground paths, and introduce noise. However, there’s one main output – the Output Jack’s sleeve. If your pickguard does not have shielding: you’ll need to add shielding or jumpers to ground your guitar’s electronics.
PAY ATTENTION TO YOUR SURROUNDINGS
A lot of grounding mistakes come from not checking your surroundings. If your parts mount to a metal plate or shielding, chances are, they are already connected electronically. In this situation, running extra jumper wires would only over-ground your electronics.
The Telecaster Control Plate pictured below is connecting all electronics. By connecting only one ground wire from the Volume Pot to the Output Jack, you ground your parts thoroughly.
See below:
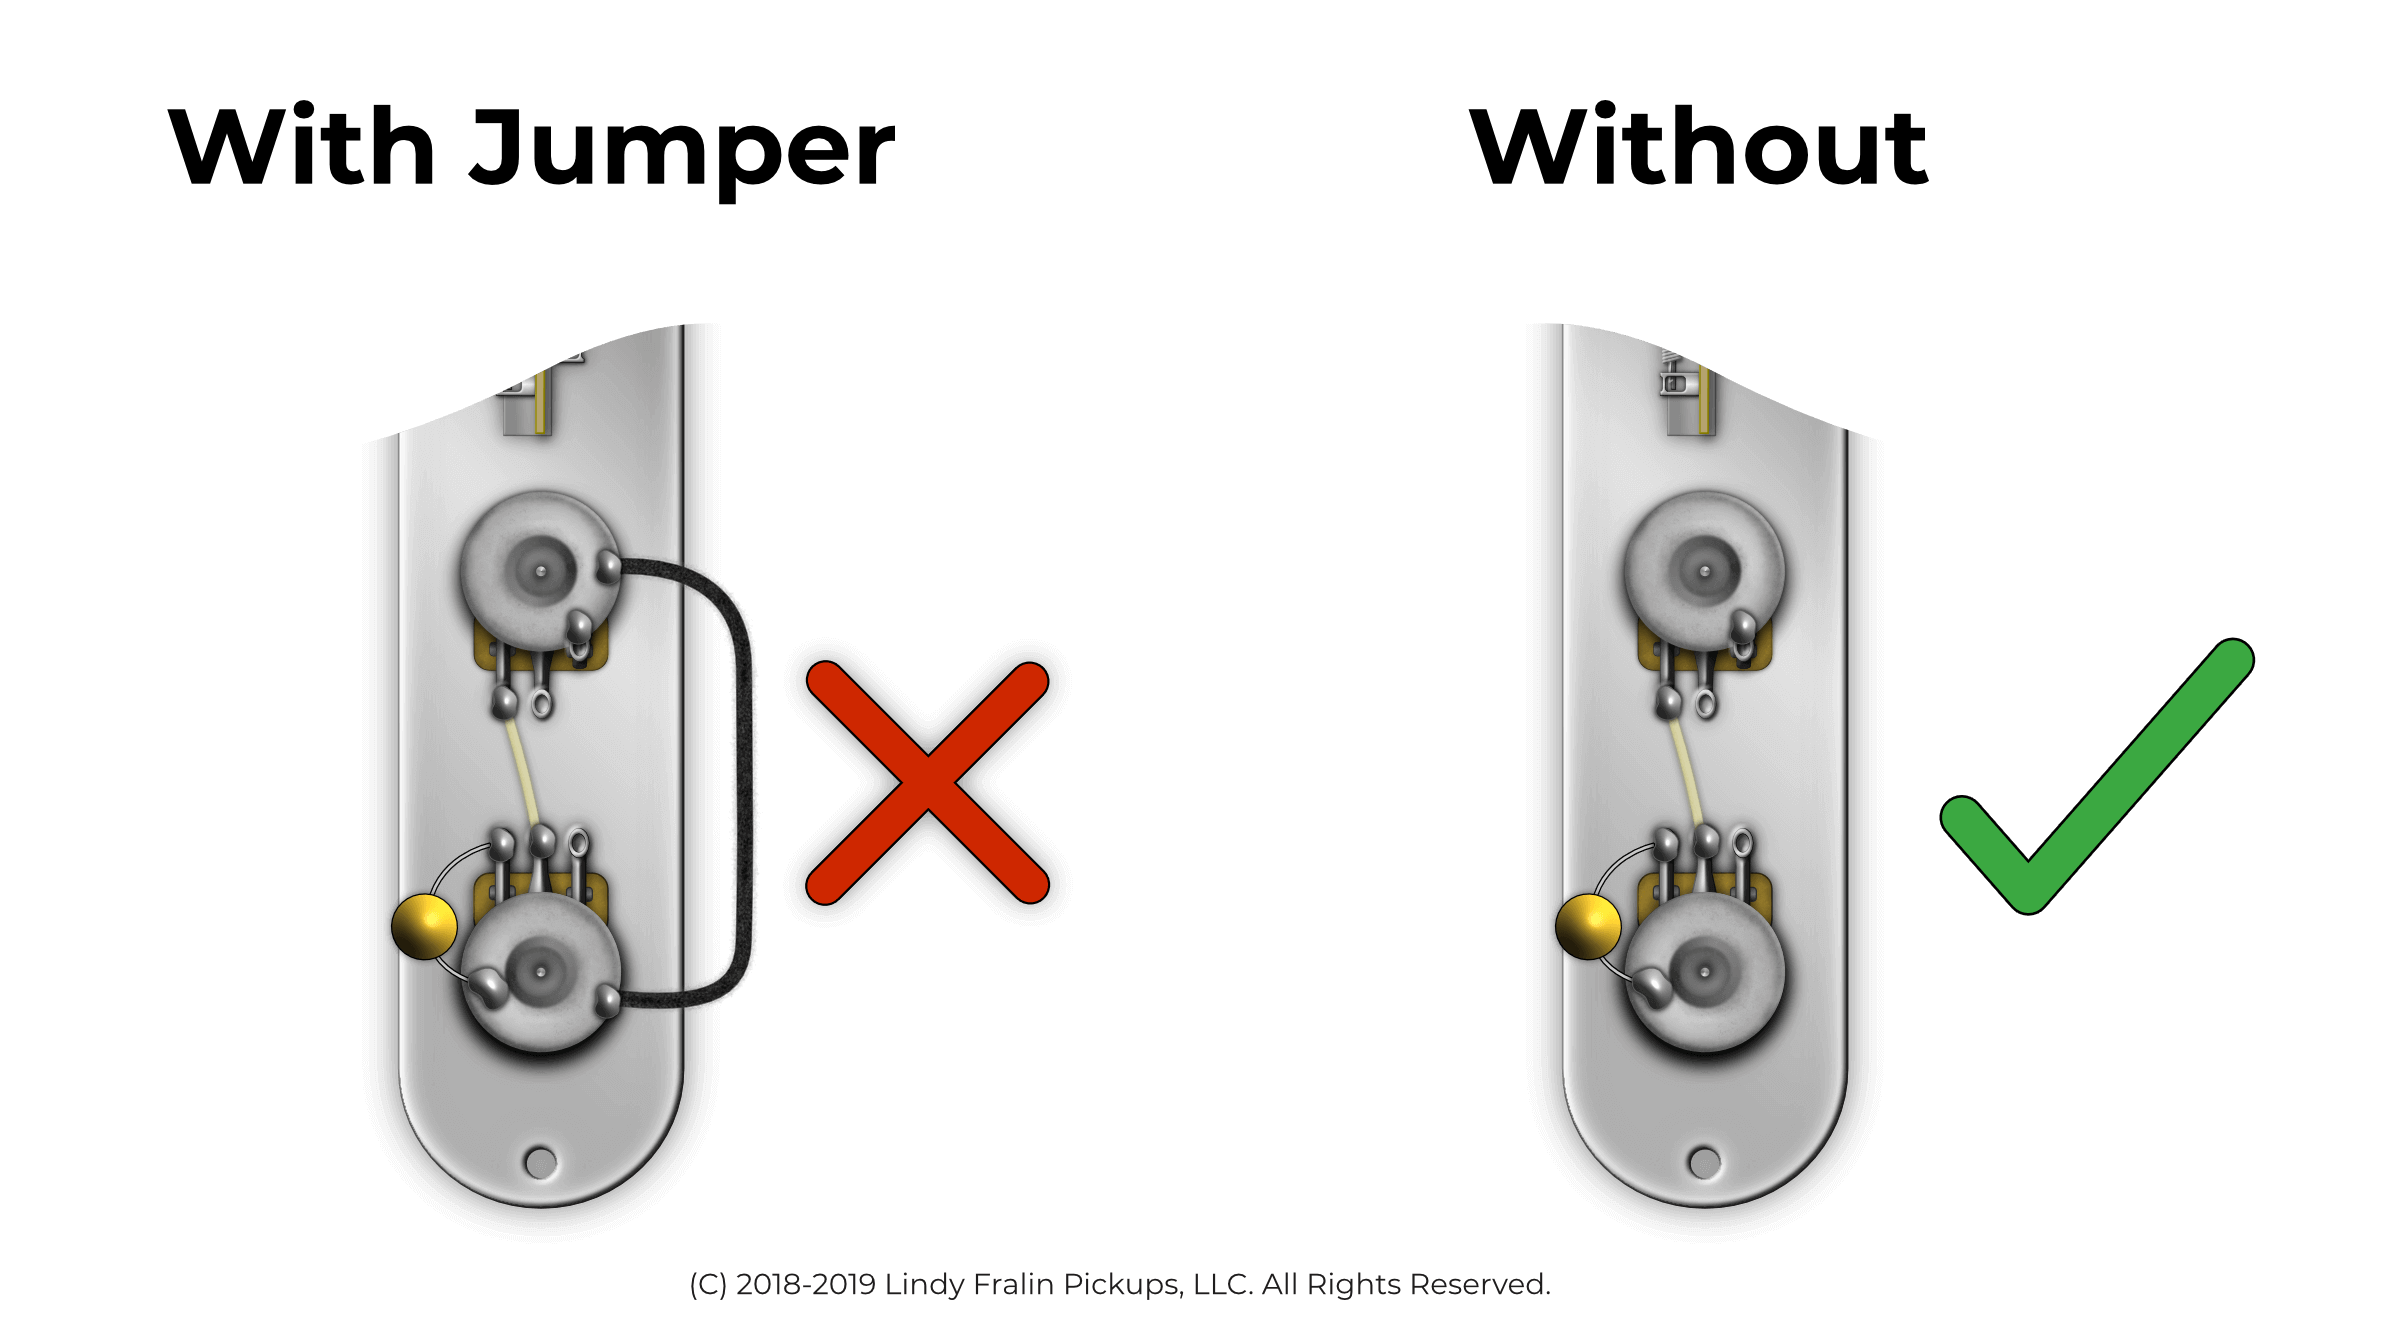
If your bridge pickup’s screws thread into the steel plate like ours do, then that should be enough to ground out your strings, since the steel plate connects to ground. Furthermore, double-check to make sure there are no stray ground wires wedged under the Saddle Plate.
HUNTING DOWN GROUND PROBLEMS
If you’re experiencing Ground problems on your guitar, there’s an effortless way to hunt them down. If you don’t own one already, invest in a Multimeter – you can purchase a decent one for $25. Follow the following steps here:
- With your guitar’s electronic cavities open, turn your multimeter to the D.C. Resistance setting, about 20K.
- Hold one terminal on the back of the volume pot, (B on the above strat pickguard image)
- Use the free terminal to touch every metal piece, and pay attention to the reading of the Multimeter.

If your Multimeter reads “0.0”, you have a solid connection – there is zero resistance between the two parts. If your Multimeter reads “0.L”, you have a severed connection, and this is at least one of your problems. You’ll need to run a ground jumper to make sure the part gets appropriately grounded.
Note: Make sure you perform this on every part of the guitar, including the Bridge, Switch, and Output Jack Sleeve Tab.
Note 2: If everything checks out in your guitar, start looking at your cable. Check to make sure that your cable’s sleeve is correctly attached to ground.
Lastly, Note 3: If you have Shielding or Conductive Paint, make sure that there is a connection to ground.
That should just about do it for now! Grounding is very simple: make sure everything is grounded, but only once. Don’t overthink it!
Comments
81 Comments For This Post
Leave A Comment
Want to chime in to the conversation? Please do so! Please respect others.









Ironically, you perpetuate the myth here that you can have a ground loop in an electric guitar itself. This myth had been debunked.
Hey,
Not sure if these are getting responses or not. I’m fairly well versed in shielding in that at least I’ve done it a couple times.
I know an object of it is connecting all metal on the guitar to a common ground.
One thing that is telling me up, I’m planning on installing at least one pickup ring to a guitar I’m working on currently, how critical is it do you think that the screws mounting the pickup ring to the body of the guitar are connected to the ground? I’ve even considered using practice screws for this lmao.
Also, it has a bolt on neck, what about the neck screws and backplate being connected to the ground?
Thanks
[email protected] if any readers are bored enough to field this too lol
After having my vintera 2 jazzmaster grounded and shielded by a local tech, the tone control now only works from 1 to 3. From 3 to 10 there’s no change at all. Any ideas of what might have caused this?
listen on your diagram of strat wiring all the positives from each picup go into a piece of tape, when they come out who knows witch is witch