
Push-Pull Pot Power!
A Push-Pull Pot can add a ton of versatility to your guitar! They are a great way to add a switch, or other cool mods without modifying your guitar too much. You can use them to reverse the phase, split a Humbucker, or trick your guitar out in a fresh way. They can be a little tricky to wrap your head around, but once you get the basics, they are easy to understand.
Table of contents
A Push-Pull Pot, in its most basic definition, is a Potentiometer, attached on top of a Switch.
We refer to the switch as a DPDT (Double Pole, Double Throw) Switch. ‘DPDT’ means the switch has two separate “poles”, or sides to it.
If you’re not familiar with how pots work, we recommend going back to Part 1 and check out our article on pots here.
The Basics of Push-Pull Pots
The Pot
There are two components of a Push-Pull Pot: the Pot and the Switch. Even though they look combined, they are actually separate. As described in our previous article, the Pot is a variable resistor. It has a resistance strip and a sweeper to choose the resistance. Lug 1 is the start of the resistance strip, and Lug 3 is the end. Lug 2, or the middle lug, is the sweeper.
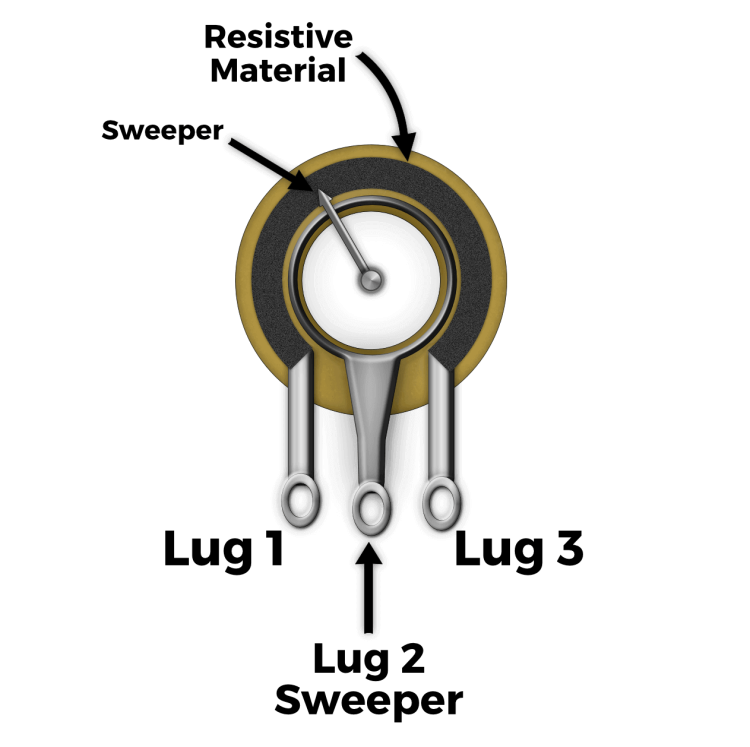
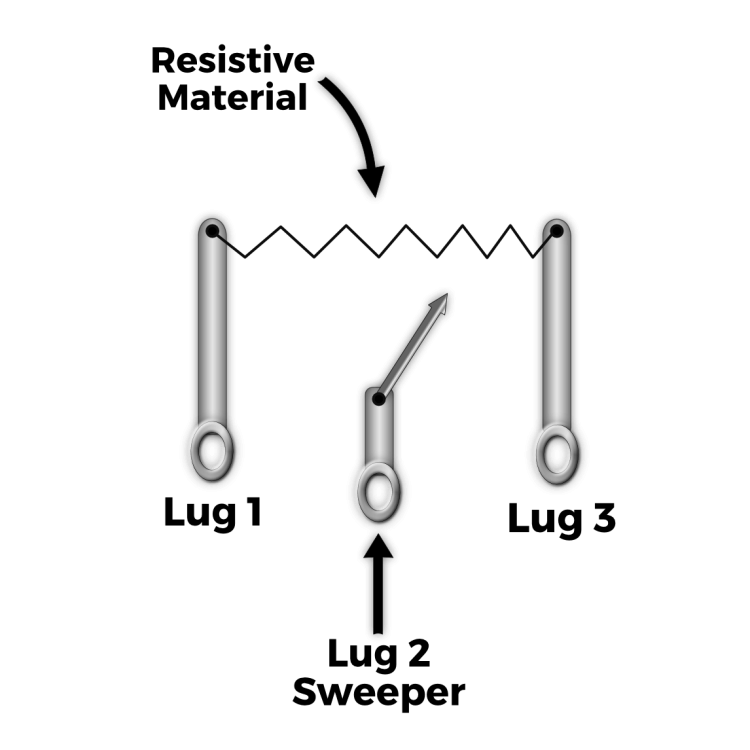
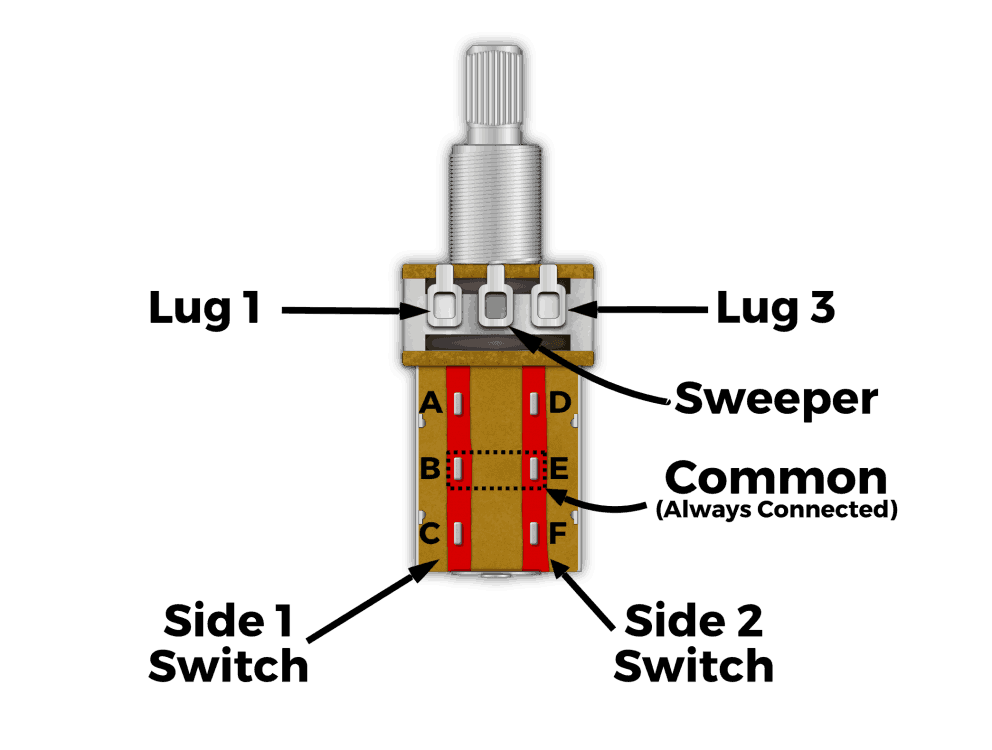
The other part of the Push-Pull pot is the Switch. The DPDT switch has two sides. Side 1 (A – B – C) is entirely independent of Side 2 (D – E – F).
We refer to the center lugs, B and E, as the “common” or inputs of the switch – they stay connected all the time. See below for an illustration of the Commons:
The Switch
There are two separate sides of the switch (hence the ‘double’ in Double Pole, Double Throw). We can call them Side A & Side B. The Selector connects the different terminals on each side. Check it out:
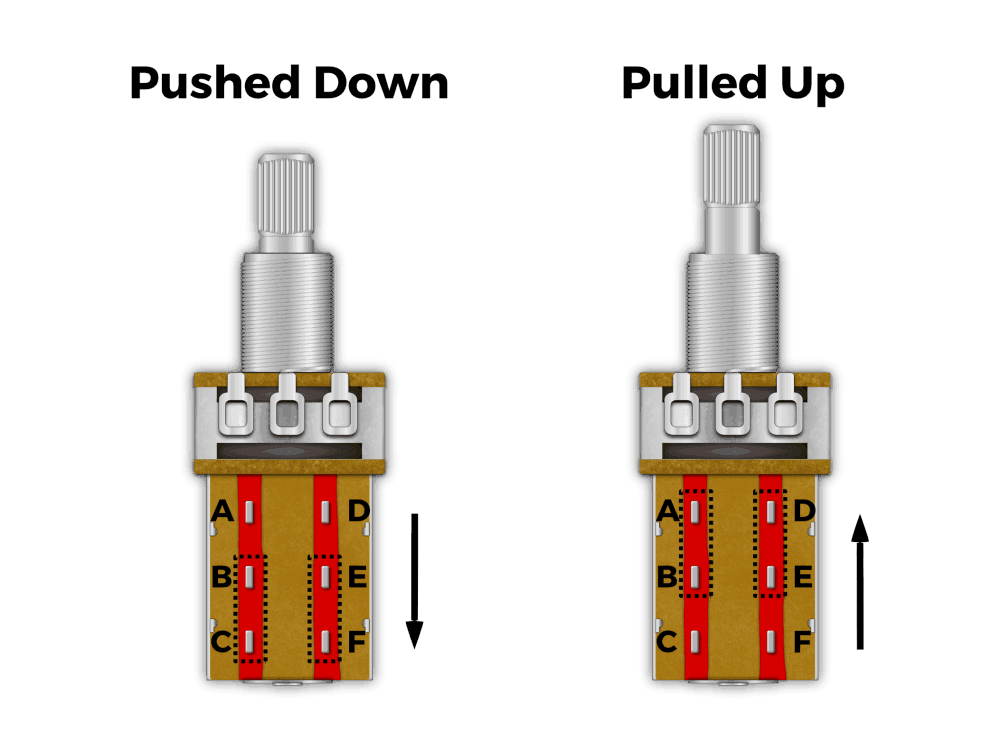
When pushed down, the Selector is selecting the bottom four lugs (B-C-E-F).
- B connects to C
- E connects to F
When pulled up, the Selector slides up and is now selecting the top four lugs (A-B-D-E).
- B connects to A
- E connects to D.
- As you can see, B and E stay connected.
Push Pull Pot Examples
Coil Splitting
Coil Splitting is just one of the many things you can do with a push-pull pot and is a great place to start our understanding of them. You can use Coil Splitting to turn a Humbucker into a Single Coil by sending one of its coils to ground.
For illustration, we drew this out for you below. We used both sides of the switch to illustrate two points:
- It shows how to wire up 3-Conductor and 4-Conductor, and
- It shows that you can tap two separate humbuckers with the same switch, by using both sides.
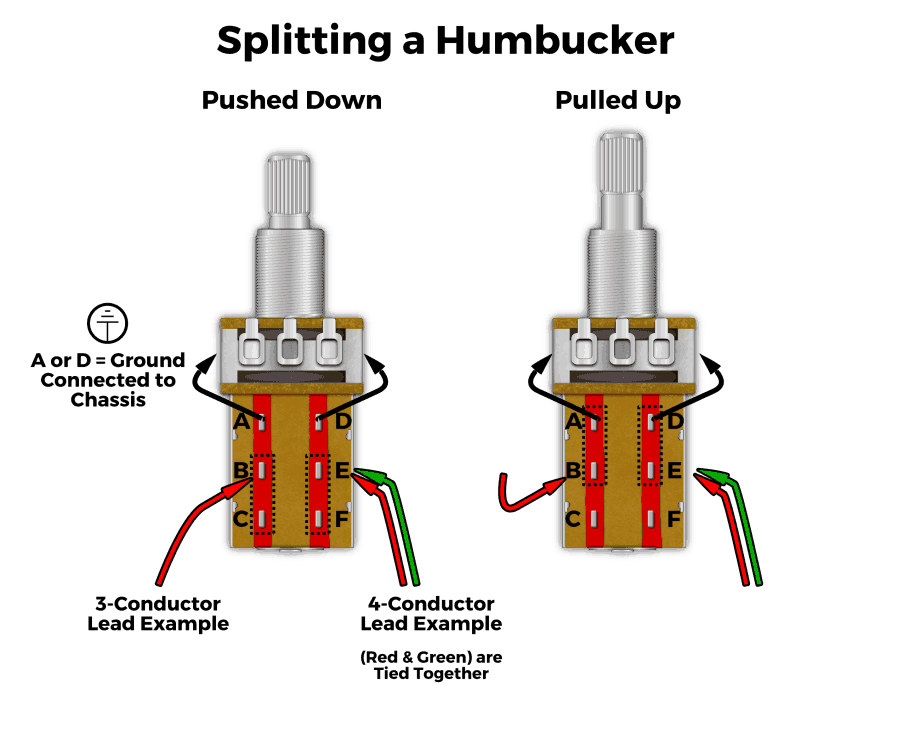
HOW IT WORKS:
- When the Push-Pull Pot is pushed down, The humbucker is working like normal.
- When the Push-Pull Pot is pulled up, the “Tap” (Red on 3 Conductor, Red, and Green Tied Together on 4-Conductor) is sent to ground, “Shorting out” the coil. The entire Casing of the pot should be grounded, so theoretically, you can ground any wire off of the switch by just running a jumper to the casing.
Partial Coil Splitting
Coil Splitting can sound great on higher output humbuckers, like our Modern P.A.F., and our High Output Humbucker. But what if you have a low-output humbucker, like our Pure P.A.F.? Fear not. You can “Partially Split” the coil, with our Partial Tap Resistor.
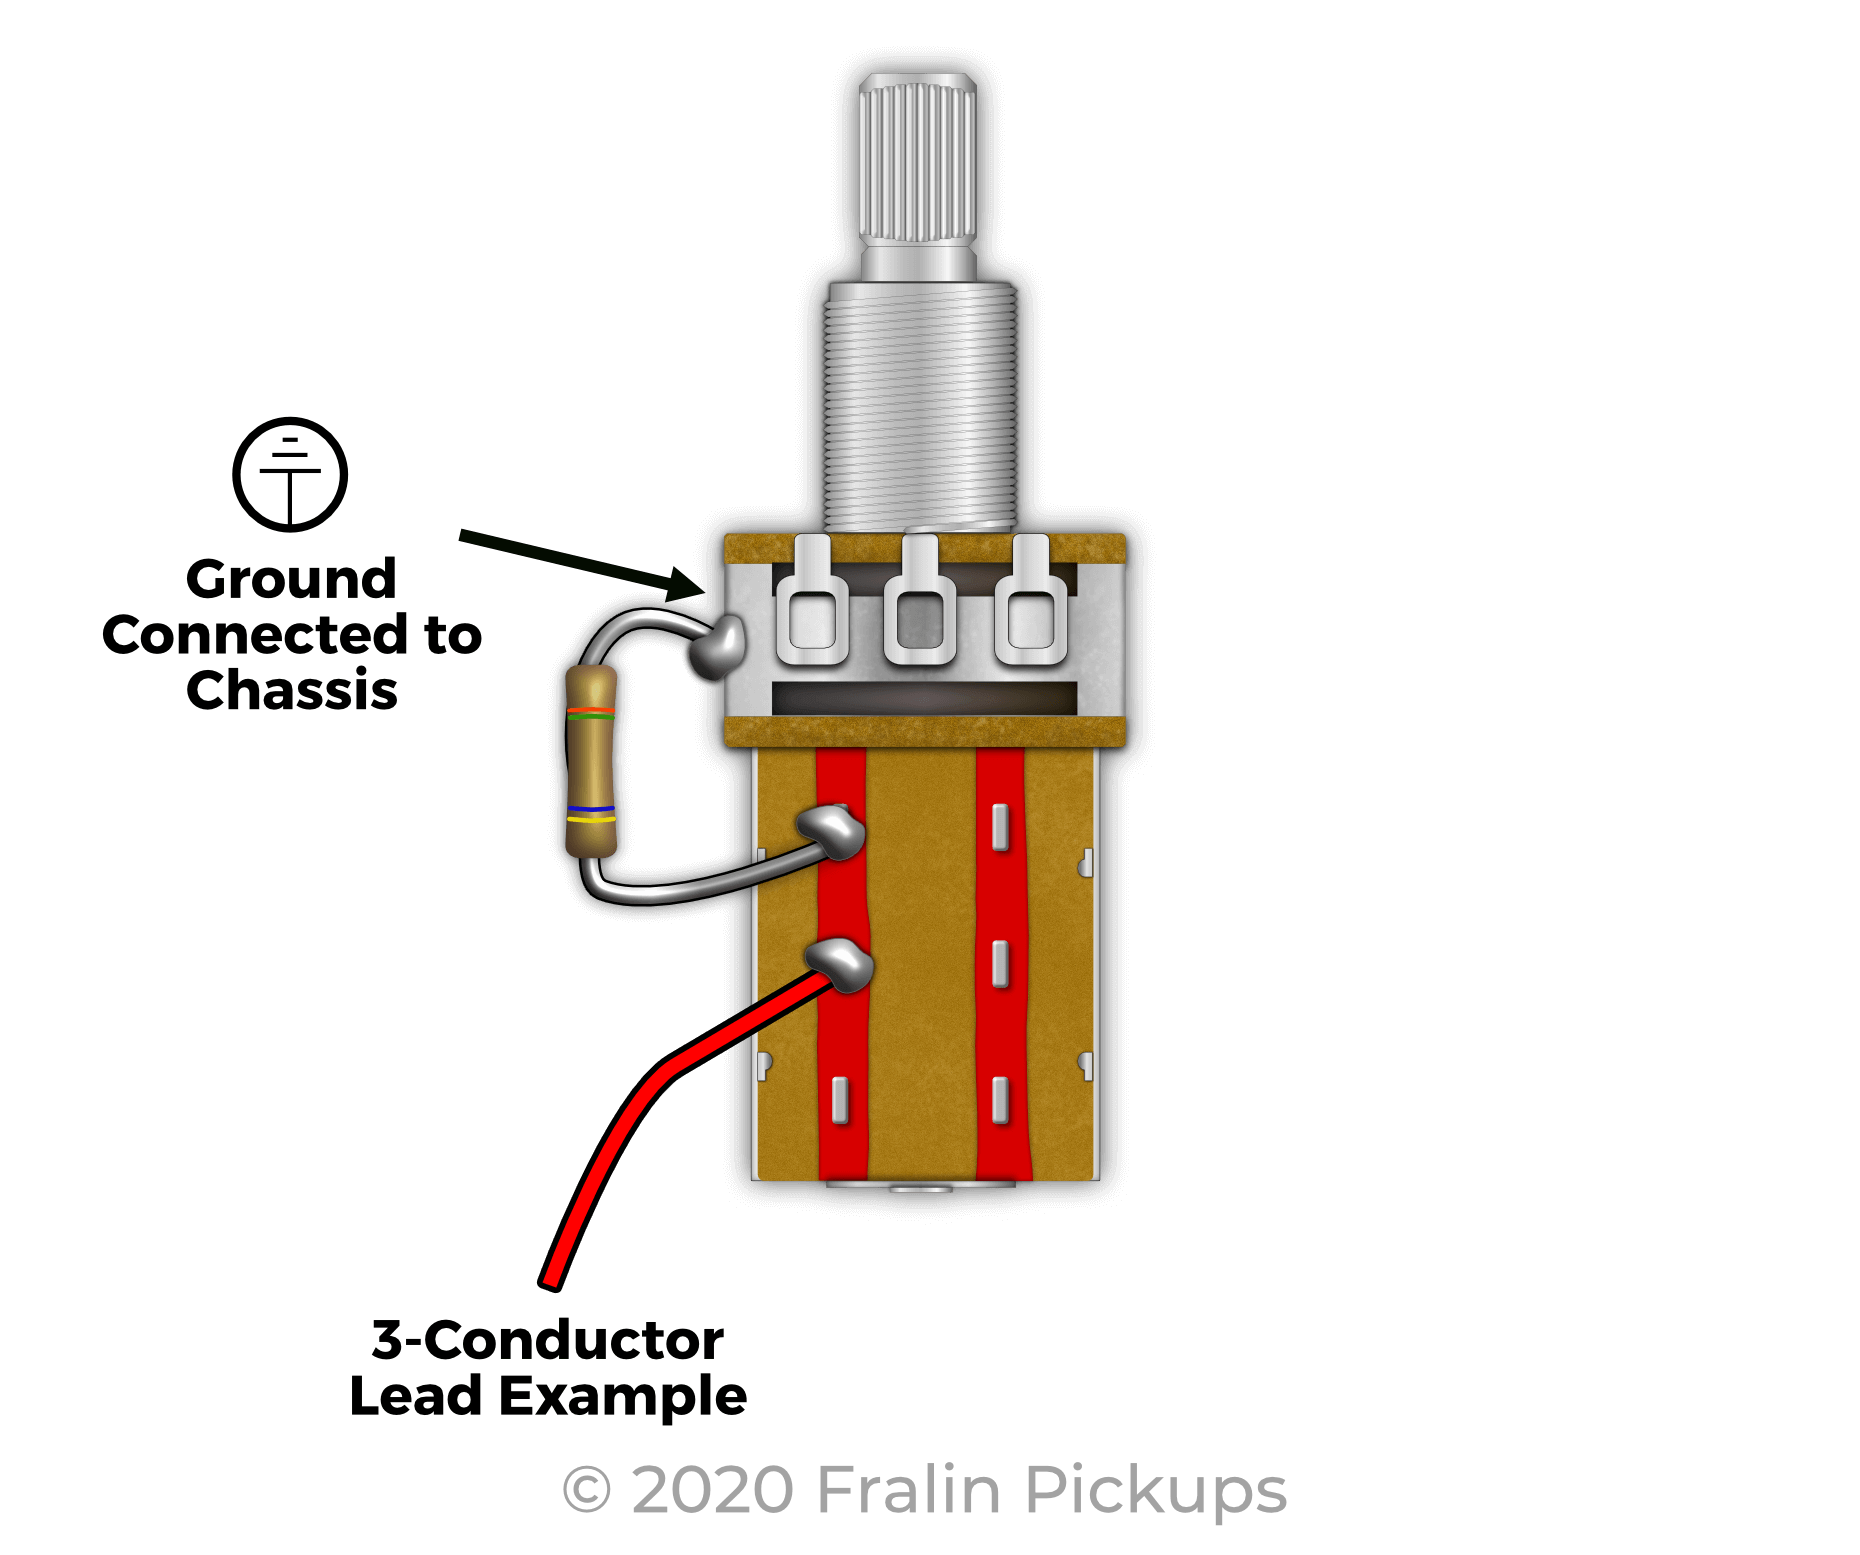
How it Works:
When you pull up on the push-pull pot, B connects to A, and your Slug Coil will be sent to ground, only this time, it goes through a resistor. This prevents the whole signal from being grounded by putting a partial short across the coil, instead of a full short. In turn, you’re getting a stronger single-coil sound from your humbucker when split.
PHASE REVERSING
Phase Reversing is a neat little trick when you want to reverse the coil direction of your pickup.
Some find this sonically pleasing, mainly when used with a Blender Pot, which will roll in the pickup’s phase – pretty cool! To do this, you need 2-Conductor Wire. Remember to ground the Shield (Bare). Here’s how to wire this up:
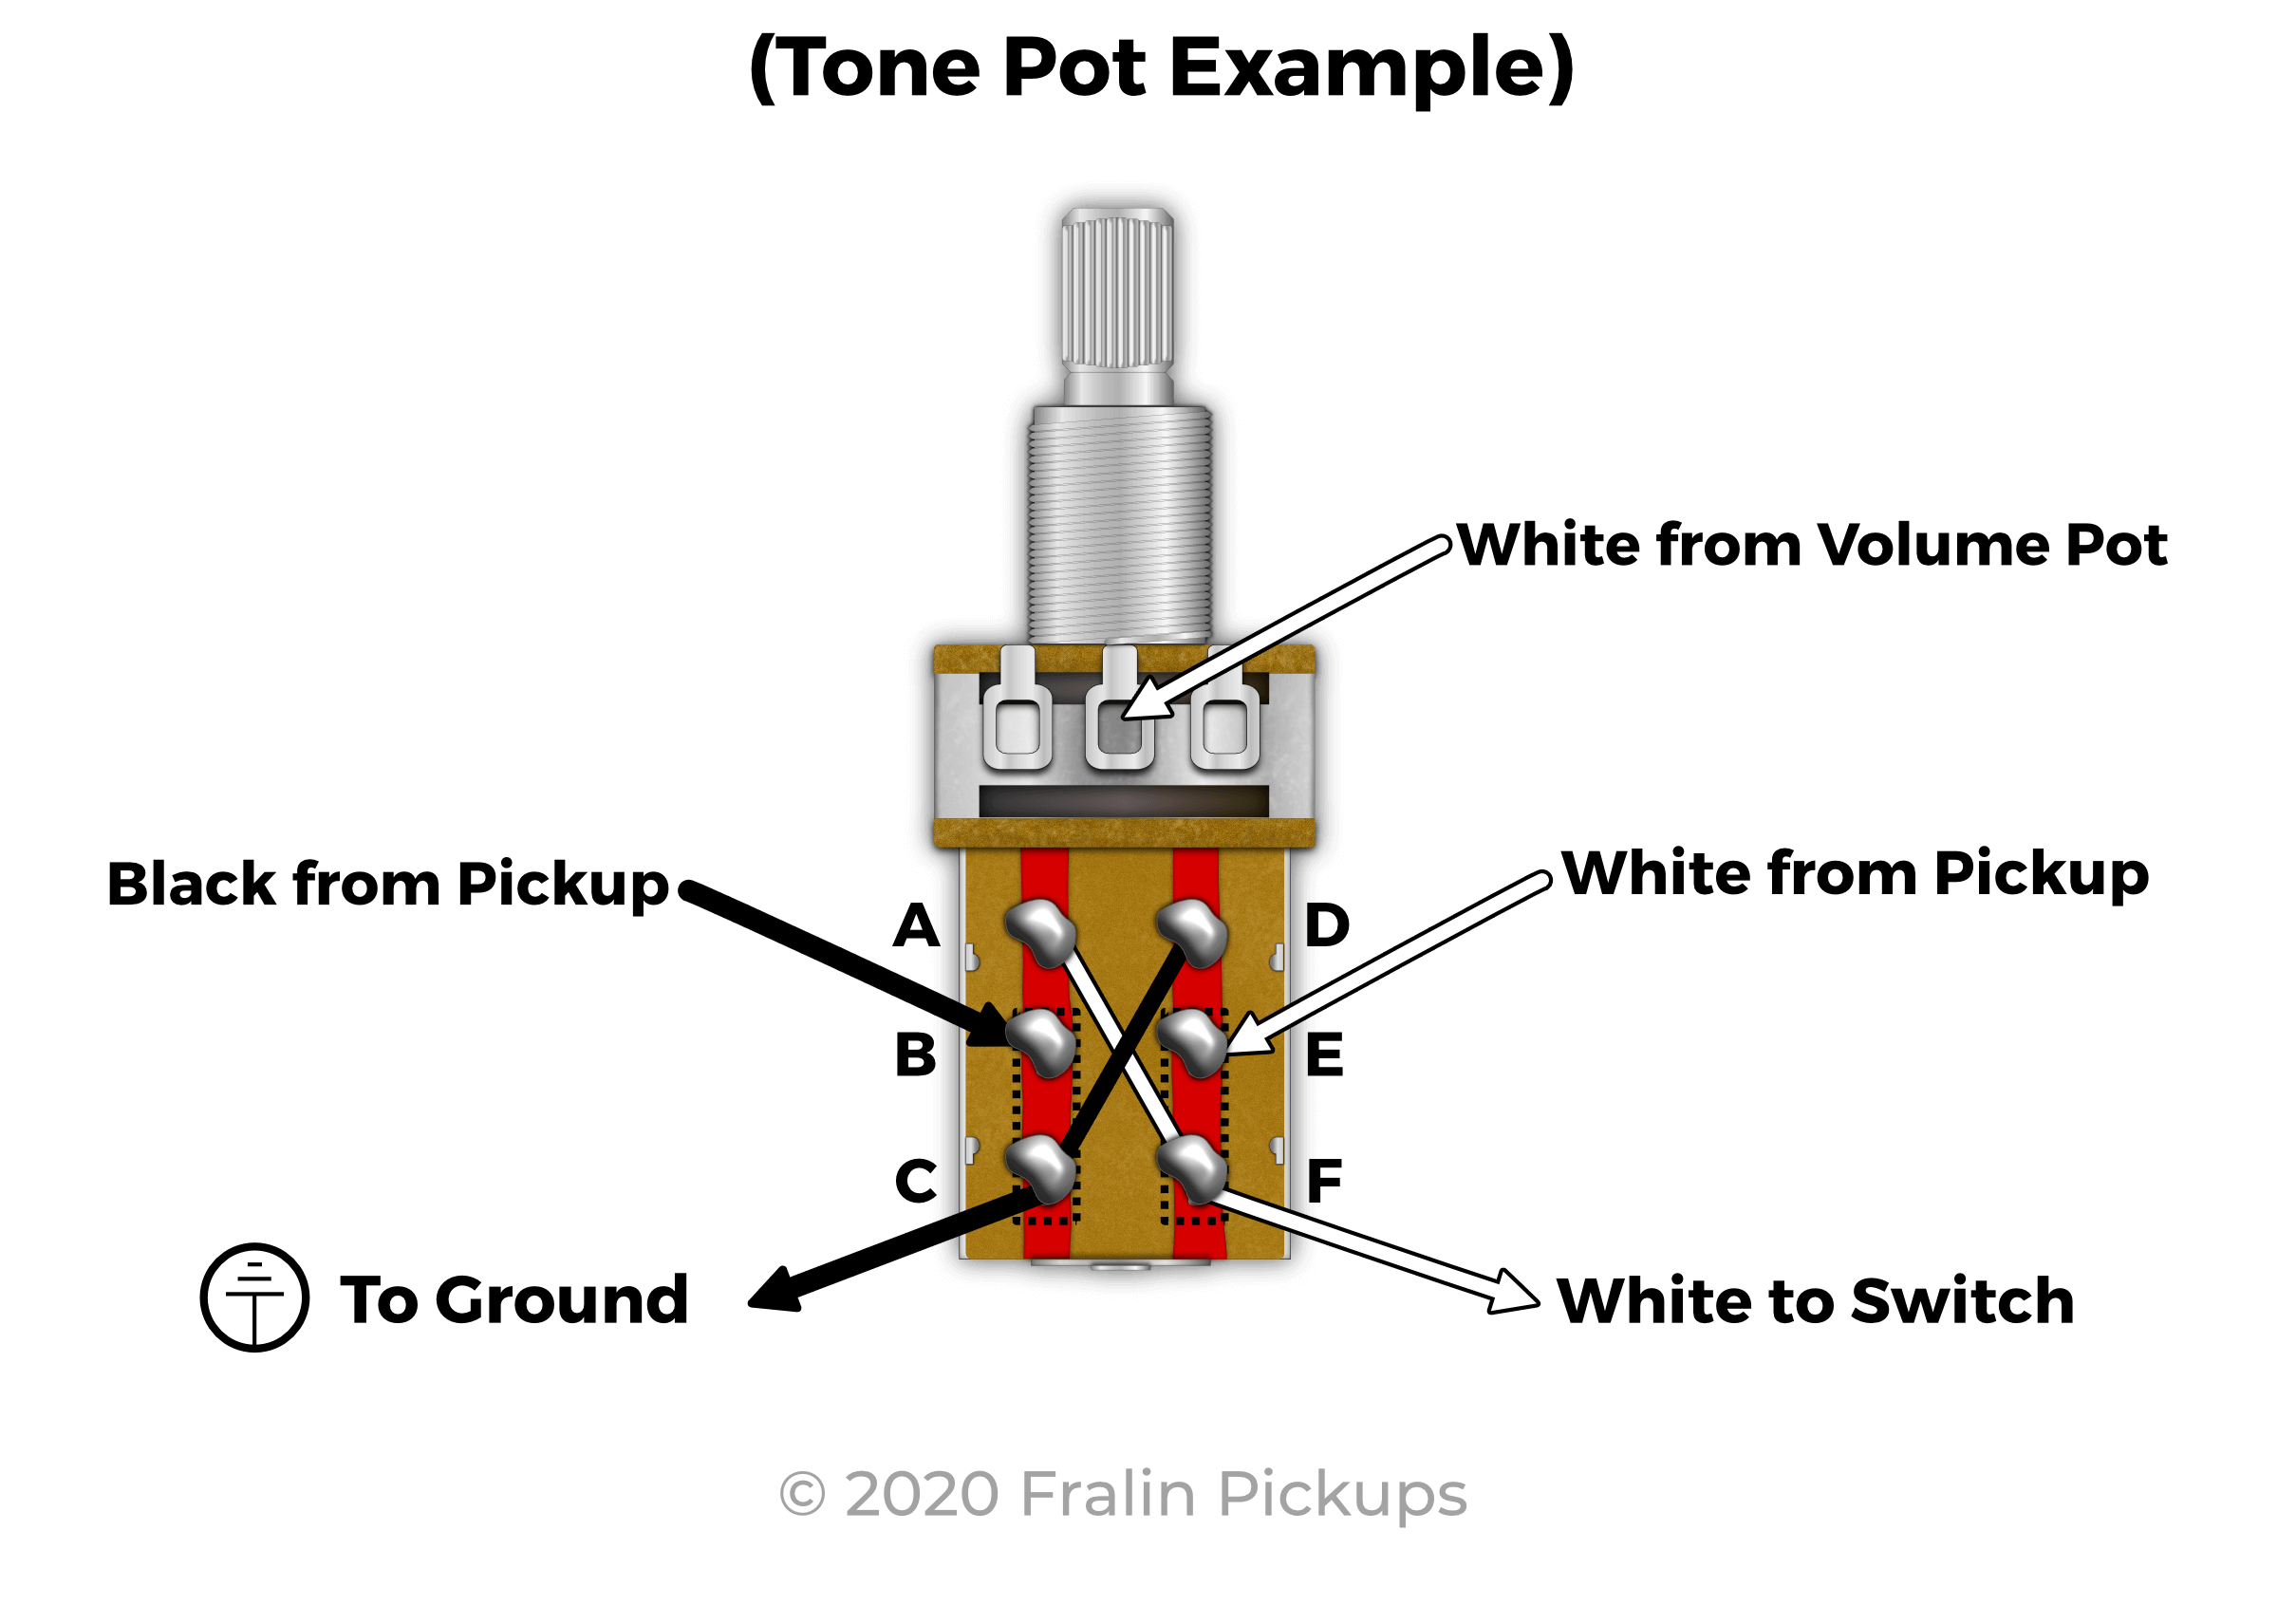
How it Works:
When the switch is in the down position, White connects to White (Terminals E > F), Black connects to Black on Terminals B > C. When pulled up, The phase reverses!
Push-Pull Pot Mods
Two-Tone Caps, One Push-Pull Pot
This mod is pretty cool! With this mod, you can use two different tone caps with one push-pull pot. When pushed down, you can have to say, a .02mfd Cap, and when pulled up, you can have a Fralin Magic Cap, or vice-versa!
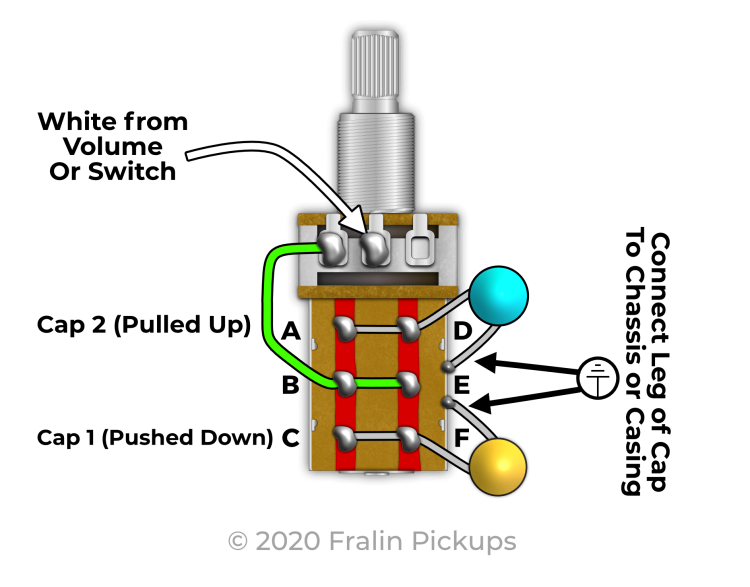
How it works:
- The Signal enters the Pot at Lug 2.
- The Sweeper, Lug 2, is connected to one side of the switch, at point E. (This whole thing can be reversed).
- When Pushed Down, the Signal is being sent through Terminal F. When Pulled Up, the Signal is being sent through Terminal D.
- The other side of the switch is Grounded. When you roll the Tone Pot, more of your highs are being sent to Ground, via whichever cap value you choose.
Engage Treble Bleed
Our Fralin Volume Kit is a great Treble Bleed circuit. If you’re not familiar, the Volume Kit keeps your high frequencies intact as you roll the volume down.
Country, Blues, and Rock guitarists love this as it keeps their crisp highs when they roll down the volume. But what if you need more versatility? Here’s how you can engage it by pulling up on the Push-Pull Pot: When pushed down, your volume knob will act like normal – it will bleed treble to ground. Pulling up on your Push Pull Pot sends your signal through the Volume Kit – your guitar keeps its shimmer!
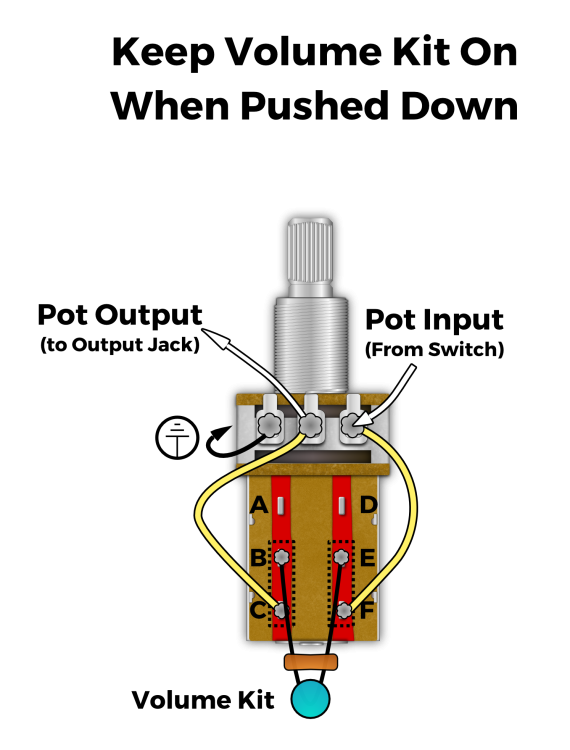
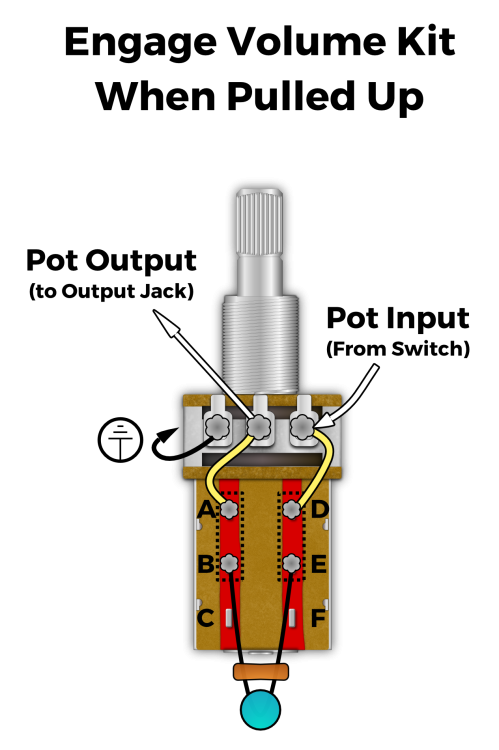
How it works:
- When pushed down, your signal is entering through lug A, but it ends there, as it doesn’t have anywhere to go.
- Pulling up, A > B connect, and E > D are now connected, connecting the Volume Kit to your circuit.
If you want to reverse this, simply move the Connector Wires (two cream wires in the photo above) to Lugs C & F. This will remove the Volume Kit when you pull up.
Bright Switch
The “Bright Switch” is a simple mod that adds a little extra Treble to your signal.
The Bright Switch works by removing your Volume Pot and Tone Pot from your signal path, which always “load” your signal. Mostly, it’s connecting your guitar’s pickups directly to the output jack. It’s a pretty crazy difference – your guitar sounds bigger, brighter, and louder.
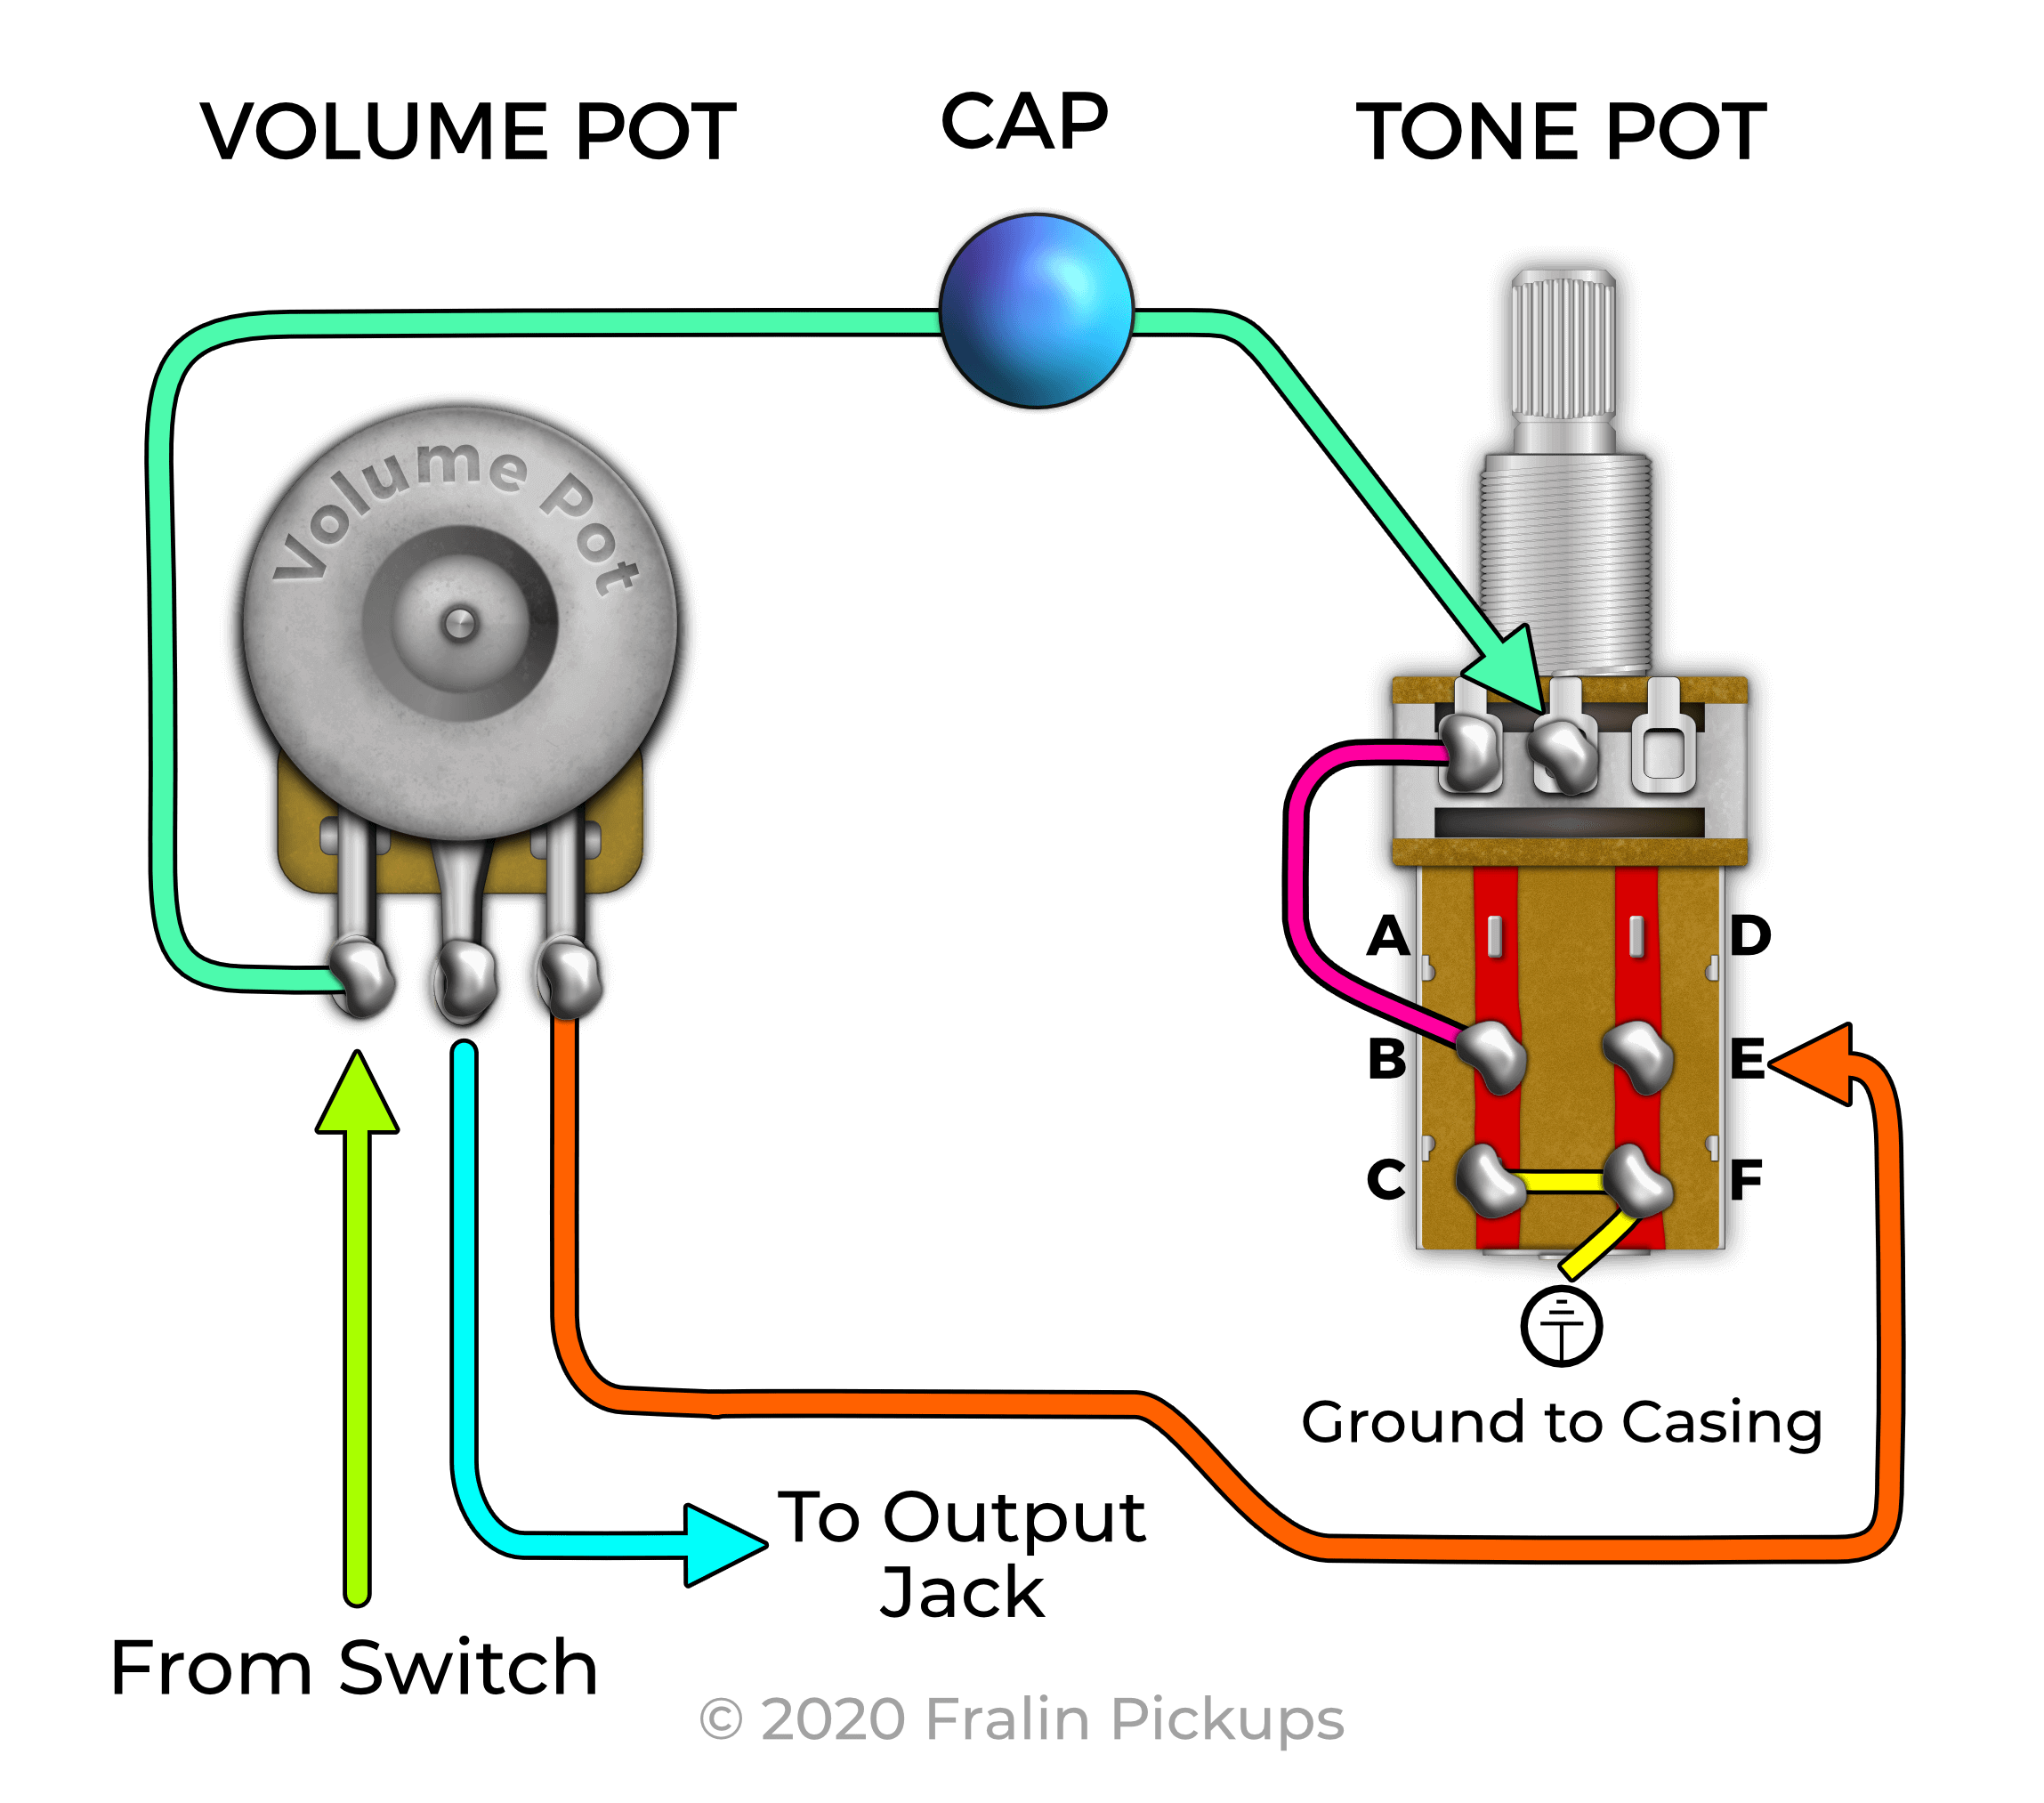
How it works:
The Bright Switch has more parts involved, thus it is a bit more complicated. When your Push-Pull pot is down, all the wiring is the same as a Strat or a Tele. The Signal enters Lug 1 of the Volume Pot, and Lug 1 is also connected to the input of the Tone Pot.
When the Push-Pull Pot is down, Lug 3 and the Cap are both connected to Ground. They connect to ground via connecting to terminals C & E of the Push-Pull pot.
When the switch is up, the ground lifts off of the tone pot and the volume pot. This allows your signal to connect directly to the output jack, with no Load.
Note: Pickups and other electronics get grounded to the back of the volume pot, just like normal. The 3rd Lug just isn’t connected.
Series / Parallel Switching For Humbuckers
Changing your humbuckers from Series to Parallel works well for some humbuckers, especially some higher output humbuckers. You can get some of that “Strat Quack,” and it opens up a whole new dimension for your humbucker. To accomplish this mod, you’ll need a humbucker with a 4-conductor lead. Please note that the color codes are for Fralin Humbuckers only.
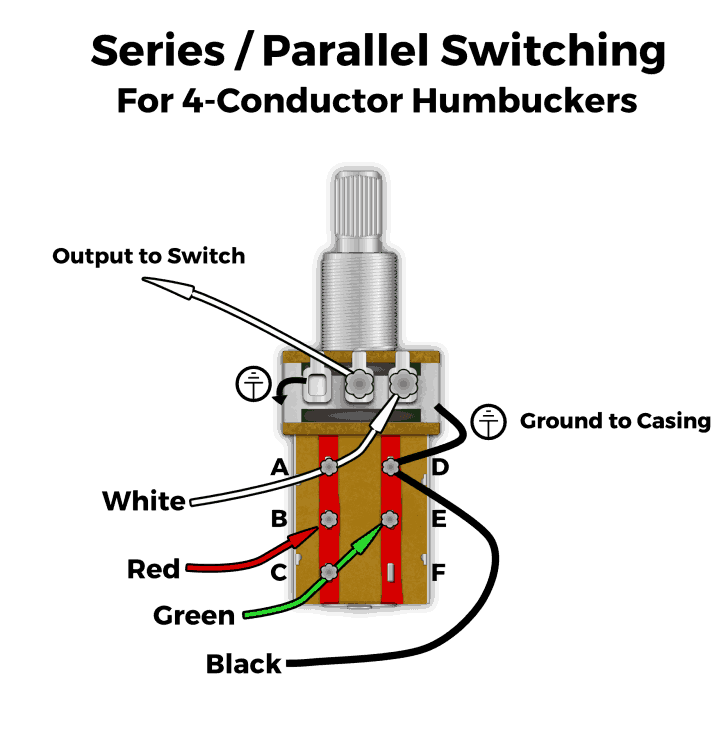
How it works:
Red connects to green Green when the switch is down. This is a regular “series” humbucker operation. By pulling up on the switch, Red is now connected to White, and Green is now connected to Black. The “hots” connect, and the “starts” connect together – giving you your parallel.
Push-Pull Pot Odds n’ Ends
Before we wrap up, here are a few things we want to clear up.
Notes On Grounding
You can use anywhere on the Pot’s chassis to ground a signal. So, when grounding wire, you can run it to the metal housing that houses the DPDT switch, or the side of the Pot itself. A neat little trick is to ground wire on the bottom tab at the very bottom of the Switch. (See the image at the top of the page to see what we’re talking about here).
CTS Pots
CTS® has a new type of Push-Pull pot, which can make wiring a little easier. CTS made these contact points easier to reach so that you can fit this pot in more guitars. However, if you’re not familiar with how it’s all connected, it can be a little confusing. Here’s what it looks like:
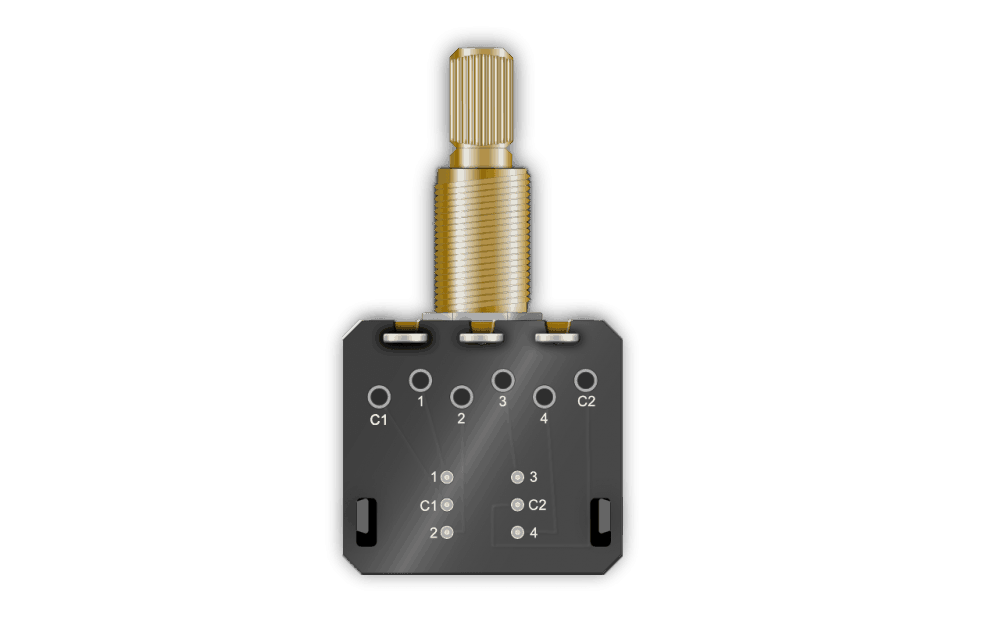
Instead of running your jumper wires to small lugs, you can run them to full-size holes. The order is a little different, but all the concepts are the same.
Well, that’s all for now. I hope that this article has been helpful and informative. We have Push-Pull pots available on our website here. Now, grab some and get to modding!
Comments
176 Comments For This Post
Leave A Comment
Want to chime in to the conversation? Please do so! Please respect others.






Hi,
I have thought about the following:
* 1 humbucker
* 1 single coil
* 1 piezo
* 3-way blade (piezo, piezo+neck, neck)
* 1 volume push-pull for bypassing only the humbucker
* 1 tone push-pull for phasing the neck
Now, I’m having some questions, apart from the remarkably genius-like “Do you know of a diagram that already does all this, or is it doable? Please help!” ??
Like:
* Can I bypass the bridge humbucker the way I’m wanting it? E.g. by pulling up the volume? That is, no matter what I have dialed in or which selector position, it’s gonna have signal.
* What will I be able to phase the neck pickup with? Can I phase it with the piezo? I would guess not, since it’s not magnetic, right? If not, can I then phase it with the humbucker even if it’s off signal (remember it’s being bypassed)? I also read somewhere about the ability to phase-in, in the event one of the pickups is off signal.
Much appreciated!
“for bypassing only the humbucker” = should read “for getting solely the signal of the HB, no matter what selection”
“* Can I bypass the bridge humbucker the way I’m wanting it?” = Can I select only the HB in that specific manner?
https://drive.google.com/file/d/1kaSq9BhLiAdSj0LsTU1zCLejONrBSj0U/view?usp=sharing
I just drew that diagram, hope it helps.
By the way, the color code is for Seymour Duncan pickups, and the piezo is considered to be passive, however, if yours is active, just connect the cables as the product instructions show, but connecting positive and negative cables as my diagram shows. Also, that diagram has a triple-shot style switching in the humbucker, if you don´´ t like it, just connect together the red and white cables, ground de green and bare wire and connect the black wire in step of red one.
Hi, really useful and well written article thank you!
Need a bit of advice please! I just received, came as unused spares with a second hand guitar, a strange 5 pot wiring harness.
Volume (B500k) and tone (A500k) pots are standard (no push-pull) but there’s a push-pull pot (A500k) between the 3 way pickup selector and the output jack. The signal cable coming from the pickup selector to the push-pull pot and the one going from there to the output jack are both soldered to the Lug 1 of the push-pull pot. Nothing else soldered there except the ground.
Also I’ve seen that the signal cable between each volume pot and its tone pot (these ones have the usual 0.047uF cap) goes from lug 2 to lug 2.
Please any advice what’s this all about would be appreciated!! I’ve seen something similar online but with a cap soldered on the push pull, one side to lug1, the other to the case and then to connector B, that cap is not present on my one
Thanks!
This and another mod I saw on the web gave me an idea that you guys might like. It’s a manual four-speed manual gear shift tone control, and it might just work. ?
See my comment at the bottom of Joe’s brilliant https://tonefiend.com/diy/new-tone-control-concept.
Hi,
Great article! Very well written and explained!
I’ve a push/pull that works fine, beside one thing: I’m left-handed and the volume curve result inverted (for me, of course) – i mean, 0% – 80% in the small first part and 20% on the rest.
Is it possibile to invert, for example, lug 1 with lug 3 to have the correct behavior?
Hope you can help me.
Hey Stelvo,
I haven’t heard of anyone successfully doing this. Maybe someone can chime in?
Tyler
Thank you for the answer Tyler,
So, to get it work right I must change the pot and eventually use a separate switch?
There aren’t any left handed push/pull switch?
Thanks so much.
For years scared of any wiring, but now getting to grips.
Great how to’s, I have a question about the dual cap tone push/pull. Where does this pot connect into the signal chain? Which lug is its input from the 5 way? Or Vol pot? and where does it send its signal?
thanks
I don’t see this question anywhere- If I want my DPDT pot switch to add the bridge pickup all the time, in my three pickup guitar, so that I can get the 1-3 combination when I have the 5-way blade selector on the neck pickup and pull the tone pot, or get the 1-2-3 combination when I have the blade selector in position 2 (neck/middle) and pull the pot, how do I wire the DPDT. I would assume that the bridge pickup lead goes to the the common, and in the down position, the signal routes to the 5 way switch like normal. But, in the up position, does the lead go directly to the single volume control? Or, instead of my assumptions, can you explain how to accomplish this?
Thanks.
I have a guitar with a 3 way toggle switch and a volume pot. Is it possible to use a single push-pull pot to wire the neck humbucker in series/parallel and the bridge humbucker in split coil?
Hey Byron,
As it turns out, you would need 2 push-pull pots to perform this operation. At very least, you would need to modify your guitar to have a SP/ST toggle switch for the Coil Split.
Tyler
Hey, so I have some humbuckers at home that only have one white lead and a bare wire and some 4 lead humbuckers coming in the mail, is there an easy way to get these out of phase to a push pull for my strat I’m building? also is there any way to have multiple mods like out of phase and coil splitting with using maybe a switch? I really want to build a guitar similar to Brian Mays red special, also I’m pretty new to modding pickups so any information or diagrams that are simple are appreciated. Thanks!
Id like to say that a little over a year ago I didnt know the first thing about guitar electronics (or even soldering at all for that matter), but I took to learning about it for improving some of my instruments, especially ones that I was considering selling because I didnt like so much anymore. They are now at least interesting and worth keeping around. I can always re-modify them as I see fit later.
This article was useful to help me learn about push-pull potentiometers. By far the most useful part is of course the beginning where one learns the basics about how the push or pull positions correspond to lug connections, and the rest of the article are just examples of possibilities that illustrate the original concept.
I didnt use push-pull potentiometers on all the instruments I modified (2 guitars and 1 bass), but given the option I dont see the point of using a regular potentiometer anymore ever if I can use a push-pull to easily add versatility to an instrument. Once you know the fundamentals about the electronic parts available for your instrument then coming up with a circuit that brings to life the ideas in your head is not so hard. Designing the circuit always became the most fun part of the project actually.
I especially want to share a specific example to provide maybe some inspiration to anyone looking to modify their instruments. I modified a 90’s Mexican Stratocaster that I’ve had since my teens. I had decided to change the stock pickups for the Fender Stratocaster Original 57/62 (which I find are very good by the way), and while I was at it also add some options to it. I replaced all 3 potentiometers for 500K push-pull potentiometers, and I replaced the conventional selector switch for a ‘5 position super switch’ to be able to achieve the following options:
All standard Stratocaster positions are available on all push:
B – (Single; bypasses tone and volume)
BM – (Parallel)
M – (Single)
MN – (Parallel)
N – (Single)
The pull positions allowed me to add the following:
BN – (Parallel)
BMN – (Parallel)
BM – (Series)
NM – (Series)
And I still had a whole extra potentiometer to work with that I devoted to reverse the phase of the M pickup (which is the pickup involved in practically all combinations). The phase shift functions on both the series and parallel connections. On a side note, Im using a 22nF capacitor for tone, and no treble bleed.
Well thats about it. The guitar is a whole lot more versatile and fun now. I was never considering selling that one but as it turns out it became my favorite now. Again, I hope this example provides for some inspiration/motivation to other readers out there. Its not very difficult at all, so be creative with your wiring as well as with your music. If you have any instrument you are considering getting rid of, hey go ahead and make it a project, it may become your favorite!! And for a fraction of the cost of buying whichever new one you had in mind.
Thanks again for the tutorial!
In a 2 humbucker, 1 Push-Pull Volume Pot, 1 Push-Pull tone pot, is it possible to set the volume Push pull as a cool split and the Tone control as a series/parallel?
Hey Charles,
You can perform this mod if each pickup has its dedicated mod. For instance, if the Neck Pickup was a Coil Split and the Bridge Pickup was the Series / Parallel mod or vice versa. You cannot perform the Series Parallel mod with both pickups, you’d need two individual push pull pots for this.
Tyler
Hi, great article!
I’m confuses with the “normal” and the CTS Pot. Ist this the right compare:
A = C1
B = 2
C = 4
D = 1
E = 3
F = C2
Thank you!
Hey Herb,
I see what you’re getting at: Here’s a comparison:
A = 1
B = C1
C = 2
D = 3
E = C2
F = 4
I hope that clears things up!
How can I wire my push-pull pot to act as a toggle switch? So when it’s down it would be my bridge humbucker and when it was up it would be my bridge humbucker.
Stupid question – For your Series/Parallel push pull pot, is that done using the a volume or tone pot? I have a strat with two HBs, 3 way blade switch, 1 vol, 2 tone.
Hey Todd,
This mod is performed with a Tone Pot.
Tyler
Hi Tyler, any advice on how I would wire a 2 tone 2 volume Les Paul for the following
•series/parallel
•in/out phase
•tone bypass for each pickup BUT still be able to adjust the volume for each pickup with its volume knob
I have four 500k CTS push/pull pots to work with. Thanks for any insight you could throw my way.
I’m not sure how you can accomplish all of these items – it seems like you wouldn’t have enough leads to accomplish it. For instance, Series / Parallel push pull uses all 4 leads of a 4-Conductor Shielded wire. I’m not sure this is possible.
If you find something, let us know!
Great article! I have a question: the intention i have is to use a push-pull pot in place of the stock 25K volume pot on our ernie ball music man stingray 5 circa 1994 axe we thump away at (mostly in the low end range) as an active/passive switch.
my understanding is the pickups themselves are passive however the preamp is active so the above would be do-able.
the only thing am a bit unsure is where the pot’s switch section will be wired to/from in that if it bypasses the volume when in passive i would need to stay with 25K value but if it retains the volume i would want to have the range to encompass the passive pickups?
any feedback would be positive.
Hey Paul,
Thanks for your question. As it turns out, I’m not 100% sure. I would recommend taking to the Bass forums where you might have a little better luck finding this answer. Good luck!
Tyler
Hi!
I have a question about the 2 capacitor tone knob. In your schematic you have the output of the volume pot going to the middle lug of the tone pot with nothing else connected to the either 2 lugs. Wouldn’t the output of the volume pot need to go to the left lug and the output of the capacitor circuit connect to the middle lug? Maybe im wrong! (probably am)
Thanks!
Would I be able to use a push/pull pot like a momentary kill switch if I put a heavy duty spring around the barrel of the pot? Assuming it would work,I would probably also want a knob with a grub screw to ensure it stays on.
Hey Stan,
What you are going for is not really what the push pull pot is designed to do, so I wouldn’t recommend it. I would go for more of a normal spring-loaded momentary switch, like the one here: Momentary Switch
Gracias. Excelente artículo.
Great article! Greatly appreciate the information!
So, I’m doing a build of a Mockingbird style, with a 3 way toggle selector, 1 vol, 2 tone (possibly vice-versa on the volume/tones). I have 2 single conductor humbuckers (not braided) and would like to put a push/pull pot for each of the three knobs to A.) Reverse Phase, B.) Bright Switch and C.) 2 Tone cap mod.
Is this possible? If so, how would the circuit work? Any advice on how to make this work would be greatly appreciated. Thanks either way!